
Get rid of Key Vault! (Making good things even better)
I love open-source, because it is a fantastic way to learn and share. I recently saw this tweet by Peter Klapwijk, who built a Logic App to monitor licenses of your Microsoft 365 tenant. The solutions uses
- a Logic App with an Office 365 API connection (to send emails with the built-in Outlook connector)
- a Key Vault (to protect the secret that is generated for the Azure AD app registration)
- manual deployment with a custom template
As much as I love the idea of the solution, I felt this can be improved - and this is of course complaining on a very high level.
I wanted to do two things:
- Get rid of the secret and the Key Vault
- Automate deployment
Get rid of the app registration
You may ask- How does this work? At least that was Peter’s first question :-) App registrations in Azure Active Directory (which handles identity and access management) give your app an identity and we can assign (and consent to) permissions in different APIs (like Microsoft Graph). To make things secure, we can protect this app with a secret. Together with the app id (client id) this is username/password for the app.
As we now want to protect this secret, we store can store it in an Azure Key Vault, but to log into Key Vault, we again need credentials - it’s a chicken/egg problem. Also, rotating the secret and taking care when it expires is a tedious task.
But even if you feel that Key Vault is fine - There is still an security hole:
⚠ If you have a contributor role assignment on the app (not on the Key Vault!), you can read the value of the secret that is stored in Key Vault in Kudu.⚠
Let’s face it: where there are secrets, there will be leaks.
Now there is a solution to this problem: Azure Managed Identities - give your app an identity without an app registration. It’s an amazing example on how Azure abstracts away the complex stuff (creating, storing, rotating secrets) so you can focus on the nicer parts of development. I decided to use a user-assigned Managed Identity, which is a standalone Azure resource and can be shared in case we want to add more resources to an extended version of the solution. This Managed Identity of course will need to have the permissions assigned that the previous app registration had assigned.
Automate deployment
I created Bicep 💪 files (super cool way to provide an ARM template) and split the template so that I can call every resource (Logic App, Managed Identity, API connection) as a module from the root deployment file and end up with separate files for each resource. That is more convenient to work with during development and also makes debugging easier.
param connections_office365_name string = 'office365'
param workflows_Monitor_main_name string = 'Monitor-LogicApp'
param userAssignedIdentities_Monitor_Identity_name string = 'Monitor-ManagedIdentity'
param ResourceGroupName string
param resourceLocation string


module managedIdentityDeployment 'Monitor-ManagedIdentity.bicep' = {
  name: 'managedIdentityDeployment'
  params: {
    userAssignedIdentities_Monitor_Identity_name: userAssignedIdentities_Monitor_Identity_name
    resourceLocation: resourceLocation
  }
}

module connectionsDeployment 'Monitor-connections.bicep' = {
  name: 'connectionsDeployment'
  params: {
    connections_office365_name: connections_office365_name
    resourceLocation: resourceLocation
    ResourceGroupName: ResourceGroupName

  }
}

module MainDeployment 'Monitor-main.bicep' = {
  name: 'MainDeployment'
  params: {
    resourceLocation: resourceLocation
    userAssignedIdentities_Monitor_Identity_name: userAssignedIdentities_Monitor_Identity_name
    workflows_Monitor_main_name: workflows_Monitor_main_name
    connections_office365_name: connections_office365_name
  }
  dependsOn: [
    connectionsDeployment
    managedIdentityDeployment
  ]
}
I learned this one the hard way: Providing Infrastructure as Code (even if it is just for a small solution) is a faster, more sustainable and better way to deploy resources. It is painful how often GUIs change and results are not repeatable then. Also, it is more convenient to run a script rather than having to click yourself through a lengthy README file. (Been there as well)
The script will create the resource group that holds the resources and assign the correct Microsoft Graph permission scope to the managed identity:
Here is the interesting part that assigns the permission, full script on GitHub 💚:
$ManagedIdentity = az identity show --name Monitor-ManagedIdentity --resource-group $ResourceGroupName | ConvertFrom-Json

$principalId = $ManagedIdentity.principalId
# Get current role assignments
$currentRoles = (az rest `
    --method get `
    --uri https://graph.microsoft.com/v1.0/servicePrincipals/$principalId/appRoleAssignments `
    | ConvertFrom-Json).value `
    | ForEach-Object { $_.appRoleId }

$graphResourceId = az ad sp list --display-name "Microsoft Graph" --query [0].objectId
#Get appRoleIds for Organization.Read.All
$graphId = az ad sp list --query "[?appDisplayName=='Microsoft Graph'].appId | [0]" --all
$orgReadAll = az ad sp show --id $graphId --query "appRoles[?value=='Organization.Read.All'].id | [0]" -o tsv

$appRoleIds = $orgReadAll
#Loop over all appRoleIds - in case we later extend and need more than permission
foreach ($appRoleId in $appRoleIds) {
    $roleMatch = $currentRoles -match $appRoleId
    if ($roleMatch.Length -eq 0) {
        # Add the role assignment to the principal
        $body = "{'principalId':'$principalId','resourceId':'$graphResourceId','appRoleId':'$appRoleId'}";
        az rest `
            --method post `
            --uri https://graph.microsoft.com/v1.0/servicePrincipals/$principalId/appRoleAssignments `
            --body $body `
            --headers Content-Type=application/json
    }
}
Write-Host "🚀 -Deployment completed"
(I re-used the script that we use at ProvisionGenie 🧞)
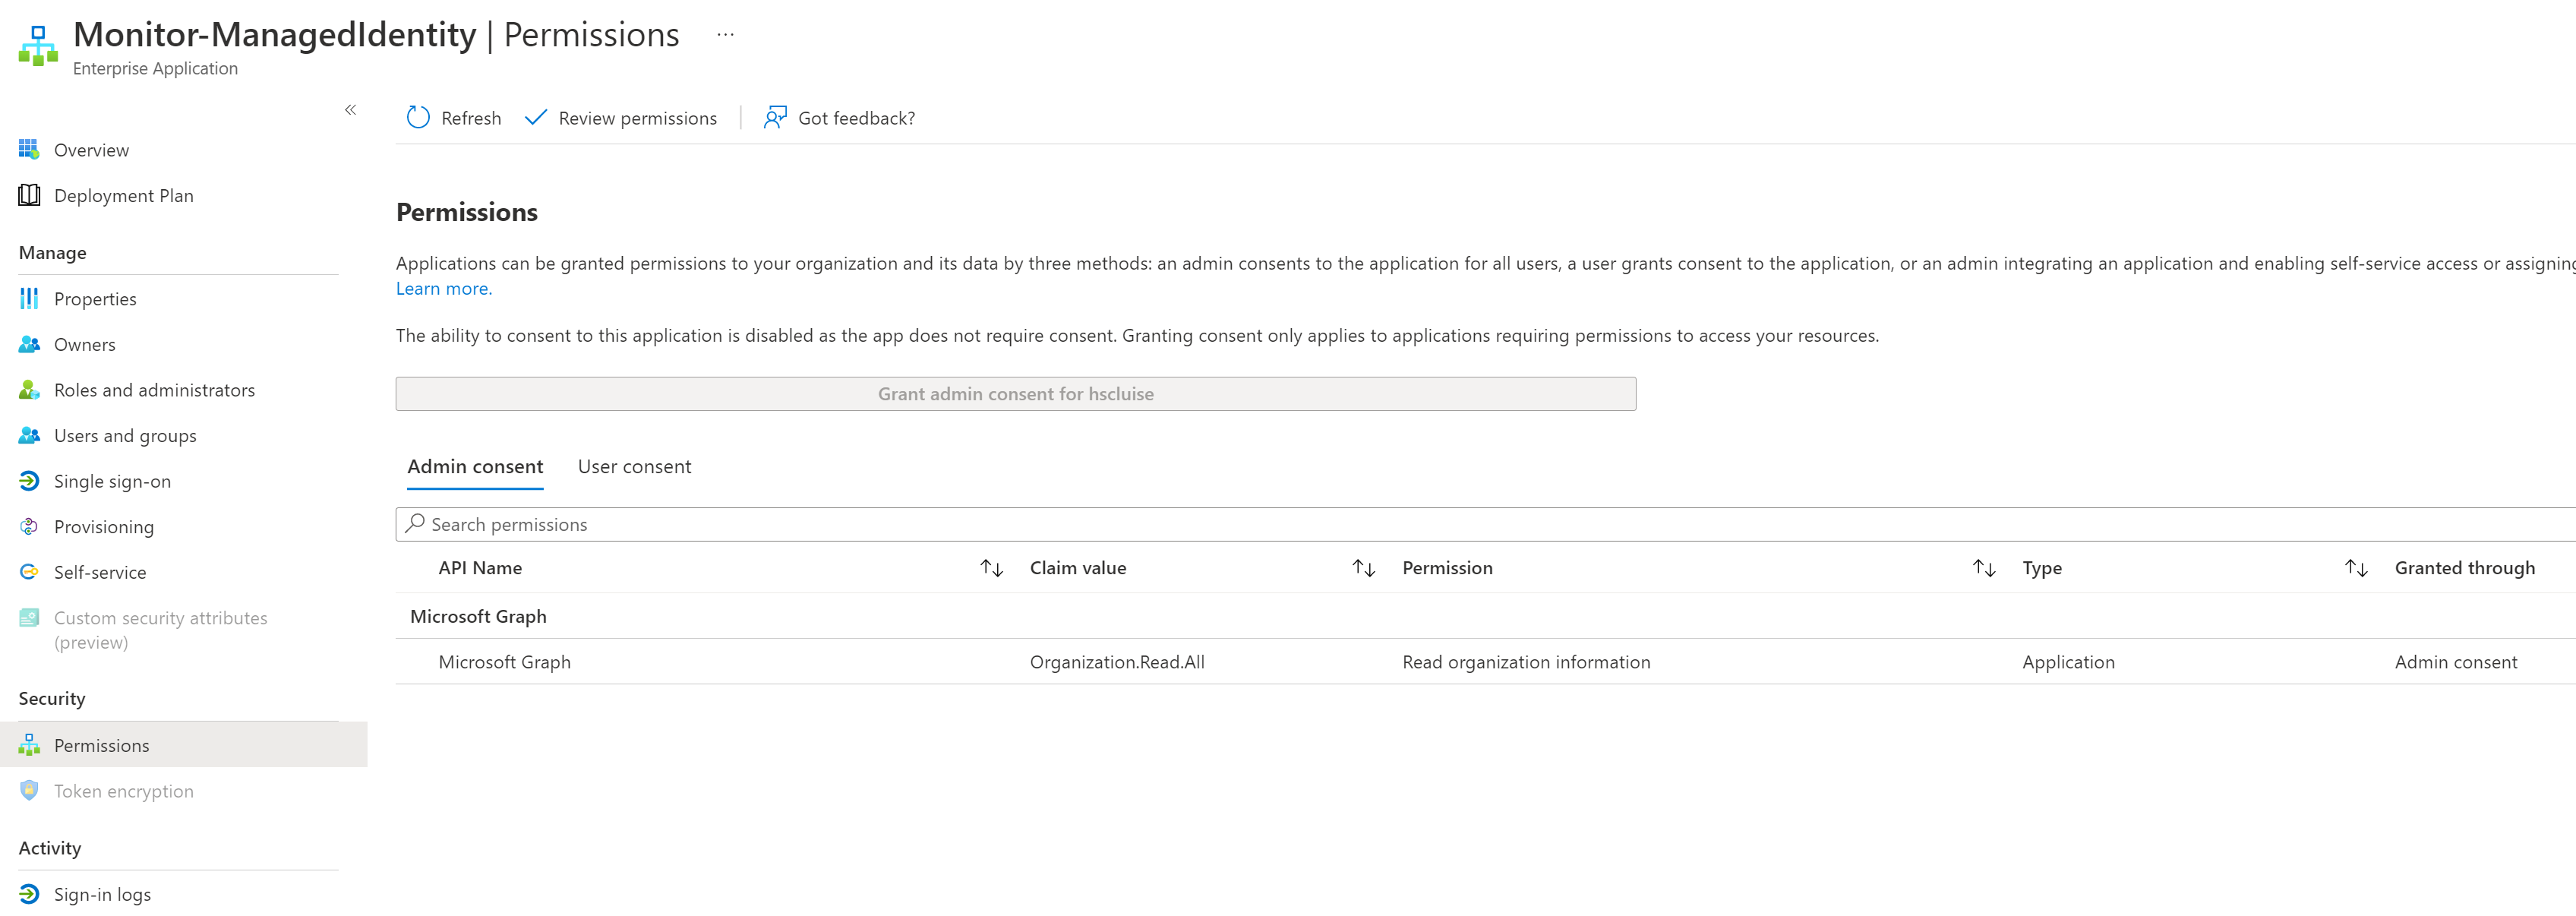
As a result, we can see the the assigned permission scope in Azure Active Directory
(Navigate to Enterprise Applications, then filter by Managed Identities, select the created Managed Identity and select Permissions):
I did a PR on Peter Klapwijks repository and added my approach there as well - communityrocks ✨
What do you think?
You like it? Let me know! You don’t like it? Let’s talk!

My name is
Luise Freese
You May Also Like

How to create a custom connector for your own Azure hosted API
In this blog post I am going to cover How to create an API with JavaScript How to deploy this to Azure How to wrap the API into a custom connector How to use the connector in Power Apps Don’t …

How to move your blog from Wordpress to Hugo
If you are a little bit like me, you started to blog some years ago on Wordpress and now don’t like it anymore. It’s clumsy and slow and kinda uncool and you would like to have a better …

How to deal with many to many relationships in Dataverse
While building an app that stores data in Dataverse, I came across a not easy to resolve problem. If you already follow me for a bit longer, you may assume that this is about ProvisionGenie, and so I …