
How to implement a Power Automate progress indicator in Power Apps
tl;dr: An indicator to show the progress of a Power Automate flow
Especially when users need to perform several tasks to complete a workload, they like to know, if the thing worked. Simple notifications like “your request has been submitted” still leave them in some uncertainty in regards of the progress of said process. Learn here how a simple SharePoint list can help you to achieve exactly that.
First idea: Respond to Power Apps
In Power Apps, we can start Power Automate flows and even get a response back, Lewis Baybutt recently blogged about how to Notify users if the flow ran successfully. But what if the flow has several big steps and we want to inform users along the way in Power Apps? Unfortunately, we can’t use the Respond to PowerApps action more than one time in a flow, which means that this is already out of the game.
Second idea: External datasource to the rescue
But what if we logged steps/status of our flow into an external table and update our app from there? This could be a Dataverse table, a SharePoint list or whatever makes you happy.
In total we will need
SharePoint list setup
I used a SharePoint list called LogList in which I need 3 columns:
- Title (comes already out of the box)
- GUID (single line of text, to hold a GUID that we get from Power Apps as we want to use
LookUpto get the right flow run) - Status (number, to hold the status/step of the flow progress)
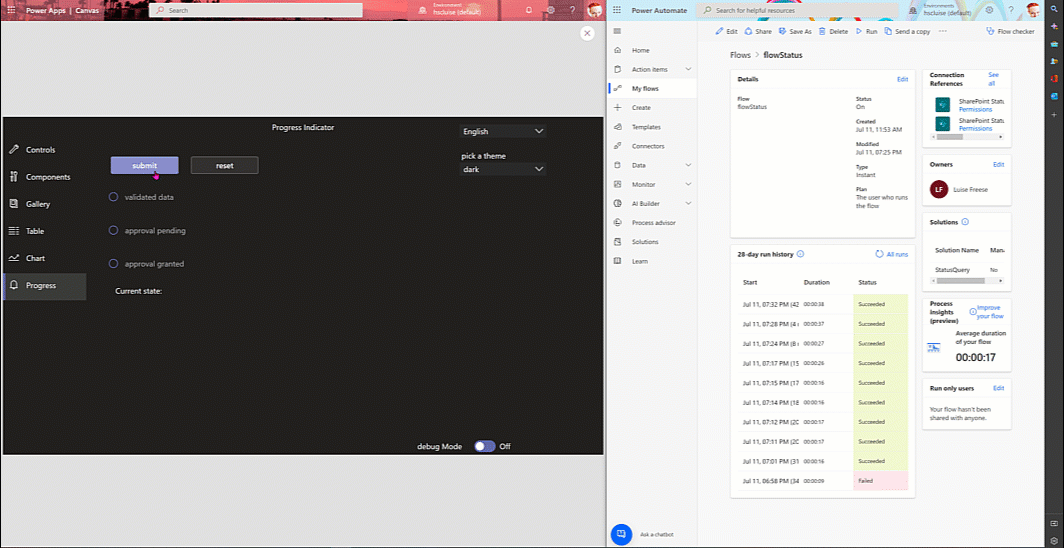
Power Apps setup
In our Power App, we need
- a button which will start the flow
- a timer which will take care of refreshing
- a gallery to indicate progress
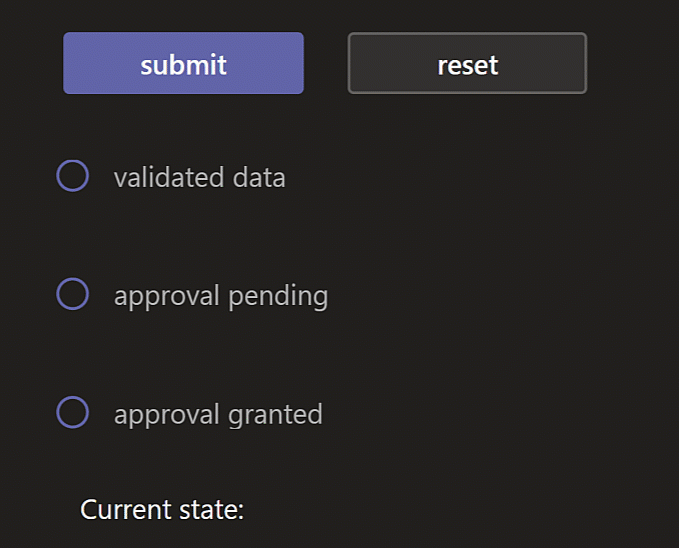
Gallery
For everything, that needs to be repeated, I use a gallery in Power Apps. The effect on time to build, design consistency and performance is really amazing.
- Set the Items property to
Table(
    {
        Id: 1,
        Value: "validated data",
        Icon: Icon.Check
    },
    {
        Id: 2,
        Value: "approval pending",
        Icon: Icon.Check
    },
    {
        Id: 3,
        Value: "approval granted",
        Icon: Icon.Check
    }
)
- Add a Label, a Rectangle, an Icon, a Circle to the Gallery
- Set the Text property of the Label to
ThisItem.Value - Set the Visible property of the Rectangle to
If(loc_currentStatus.Status>=ThisItem.Id, true, false) - Set the Fill property of the Circle to
If(loc_currentStatus.Status>=ThisItem.Id, Self.BorderColor, Transparent) - Set the Visible property of the Icon to
loc_currentStatus.Status>=ThisItem.Id - Set the Icon property of the Icon to
Icon.Check
Button
Our Button shall kick of the flow and pass in a unique ID
- Set the
OnSelectproperty of the button to
//create GUID
Set(gbl_stateGUID,GUID());

//start Power Automate Flow
flowStatus.Run(gbl_stateGUID)
Timer
We could of course build a refresh button as well for all impatient users, but a hidden timer is way more elegant.
- Set the OnTimerEnd property to
Refresh(LogList);
UpdateContext({loc_currentStatus: LookUp(LogList,GUID=Text(gbl_stateGUID))})
- Set the AutoStart property to
!IsBlank(gbl_stateGUID) - Set the Duration property to
500(ms) - Set the Repeat property to
loc_currentStatus.Status<>3
Reset button
For testing purposes its really nice as well to have a Reset button
- Set its OnSelect button to
UpdateContext(
    {
        loc_currentStatus: Patch(loc_currentStatus,
            {
                Status: 0,
                Title: "you submitted"
            }
        )
    }
);
 Set(gbl_stateGUID,"");

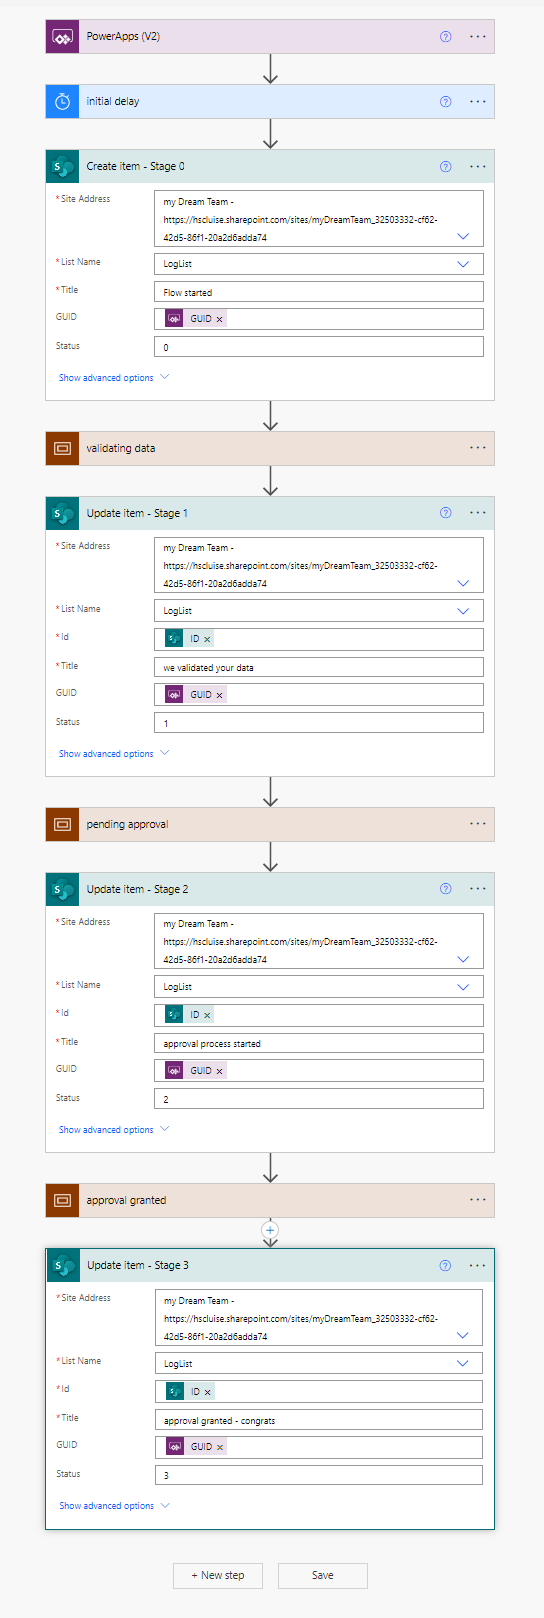
Power Automate flow setup
- Create a new flow from within Power Apps Studio, which automatically gives it the right trigger
- Create an item in your SharePoint list, pass in the GUID from Power Apps in the GUID column and set the status to
0 - Now add a scope and perform the actions you want to perform in this scope. To mock this, I added a delay
- After this first scope, update the list item with a status message in the Title and set the Status to
1 - Add another scope and perform the actions you want to perform in this scope. To mock this, I added another delay
- After this second scope, update the list item with a status message in the Title ands et the Status to
2 - Add another scope and perform the actions you want to perform in this scope. To mock this, I added another delay
- After this third scope, update the list item with a status message in the Title and set the Status to
3
Conclusion and What’s next
This is how you pass values between Power Apps and Power Automate and hook them into a nice looking UI. For flows that run for quite a while, its a nice way to inform users in-app and not to rely on sending Adaptive Cards or other notifications. I am curious: Which scenarios do you see? Let me know on twitter

My name is
Luise Freese
You May Also Like

How to enhance maker experience with a custom theme for Teams apps
tl;dr Creating beautiful UI in Power Apps canvas apps is hard - even more when the app shall run in the context of Microsoft Teams, as there is no theme out-of-the-box that matches Teams look and feel …

How to build a color-contrast-ratio checker for improved accessibility in Power Apps
tl:dr Color contrast ratio is important for accessibility - here is how to build an in-app checker to build more accessible Power Apps What is an color-contrast-ratio checker and why would I care? …

Get insights about Power Apps usage with Microsoft Clarity PCF code component
Getting insights on user behavior in Power Apps canvas apps can be in various ways - for instance, you can analyze app telemetry with Azure Application Insights and trace events. If you are more …