
The friendly SMS reminder with Logic Apps, Azure Functions & Key Vault
Yay, this is a new blog post series on how to put the FUN in Azure Functions 🙂
Recently, I was learning about Azure Functions and came up with a sweet use case what I could do to combine Azure Functions and Logic Apps: I want to automatically call or text myself (using Twilio) to remind me of recurring tasks, like putting away the laundry , buying more Lego , or similar.
There will be of course more sophisticated use cases, for the sake of an easy demonstration we will stick to this and use a simple SMS.
Prerequisites
- Azure subscription -If you don’t have one, you can get one for free here
- Twilio account
- Twilio trial number - trial comes for free - sign up here Twilio Luise (Transparency: This is a referral link, which will get you and me 10$ to spend on Twilio for cool future projects that aren’t covered by the trial. However, if you don’t like us to get the 10 bucks, you can also sign up without the referral link with https://www.twilio.com)
Here is our solution overview:
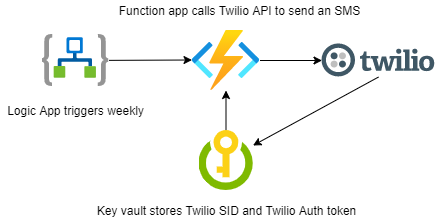
As you can see, we will touch some interesting things like
- Azure Logic Apps
- Azure Function App
- Azure Key Vault
- Managed Identity
- Twilio API
I will sometimes provide several approaches to reach the same goal, you can pick whatever feels right to you.
Azure Resource group & Function App
Ok, so we will create an Azure Function App that will do the heavy lifting for us. Our Azure Function needs a Resource group to live in, and we will first create the Resource Group and then add some resources to it.
- Go to portal.azure.com
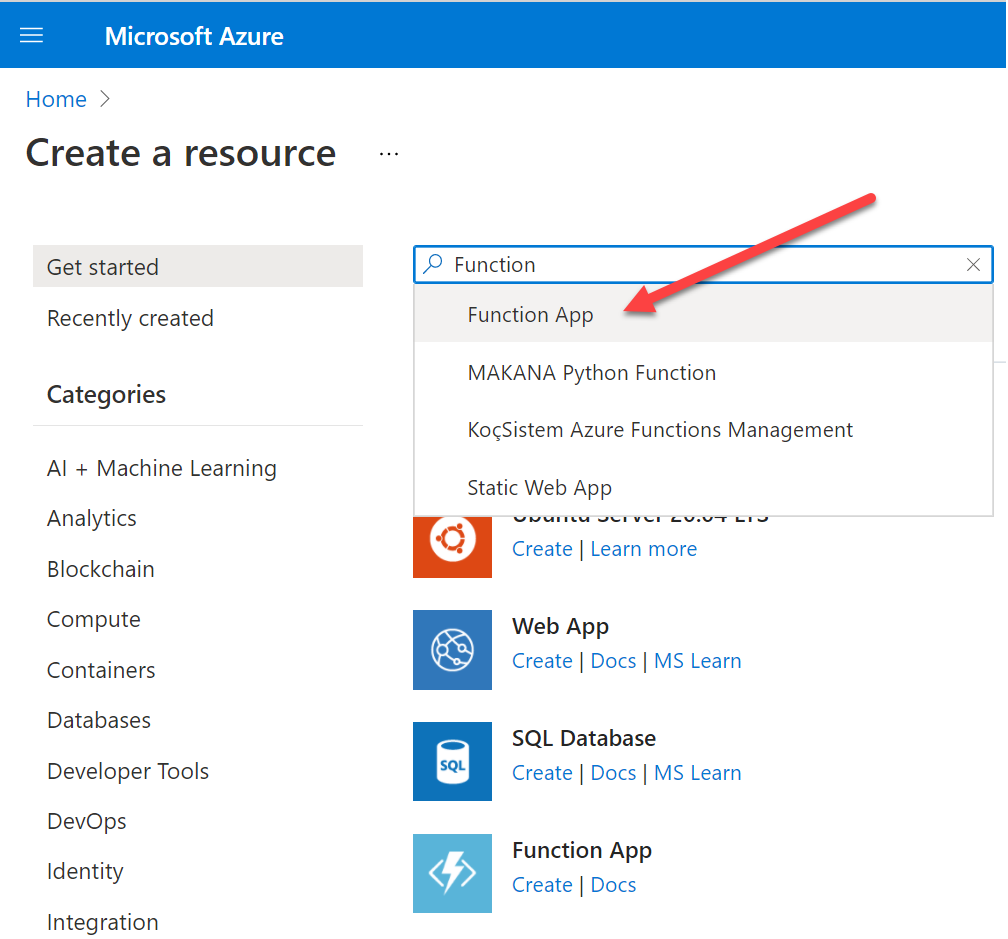
- Select Create a resource

- Search for Function App in the search bar
- Select Function App
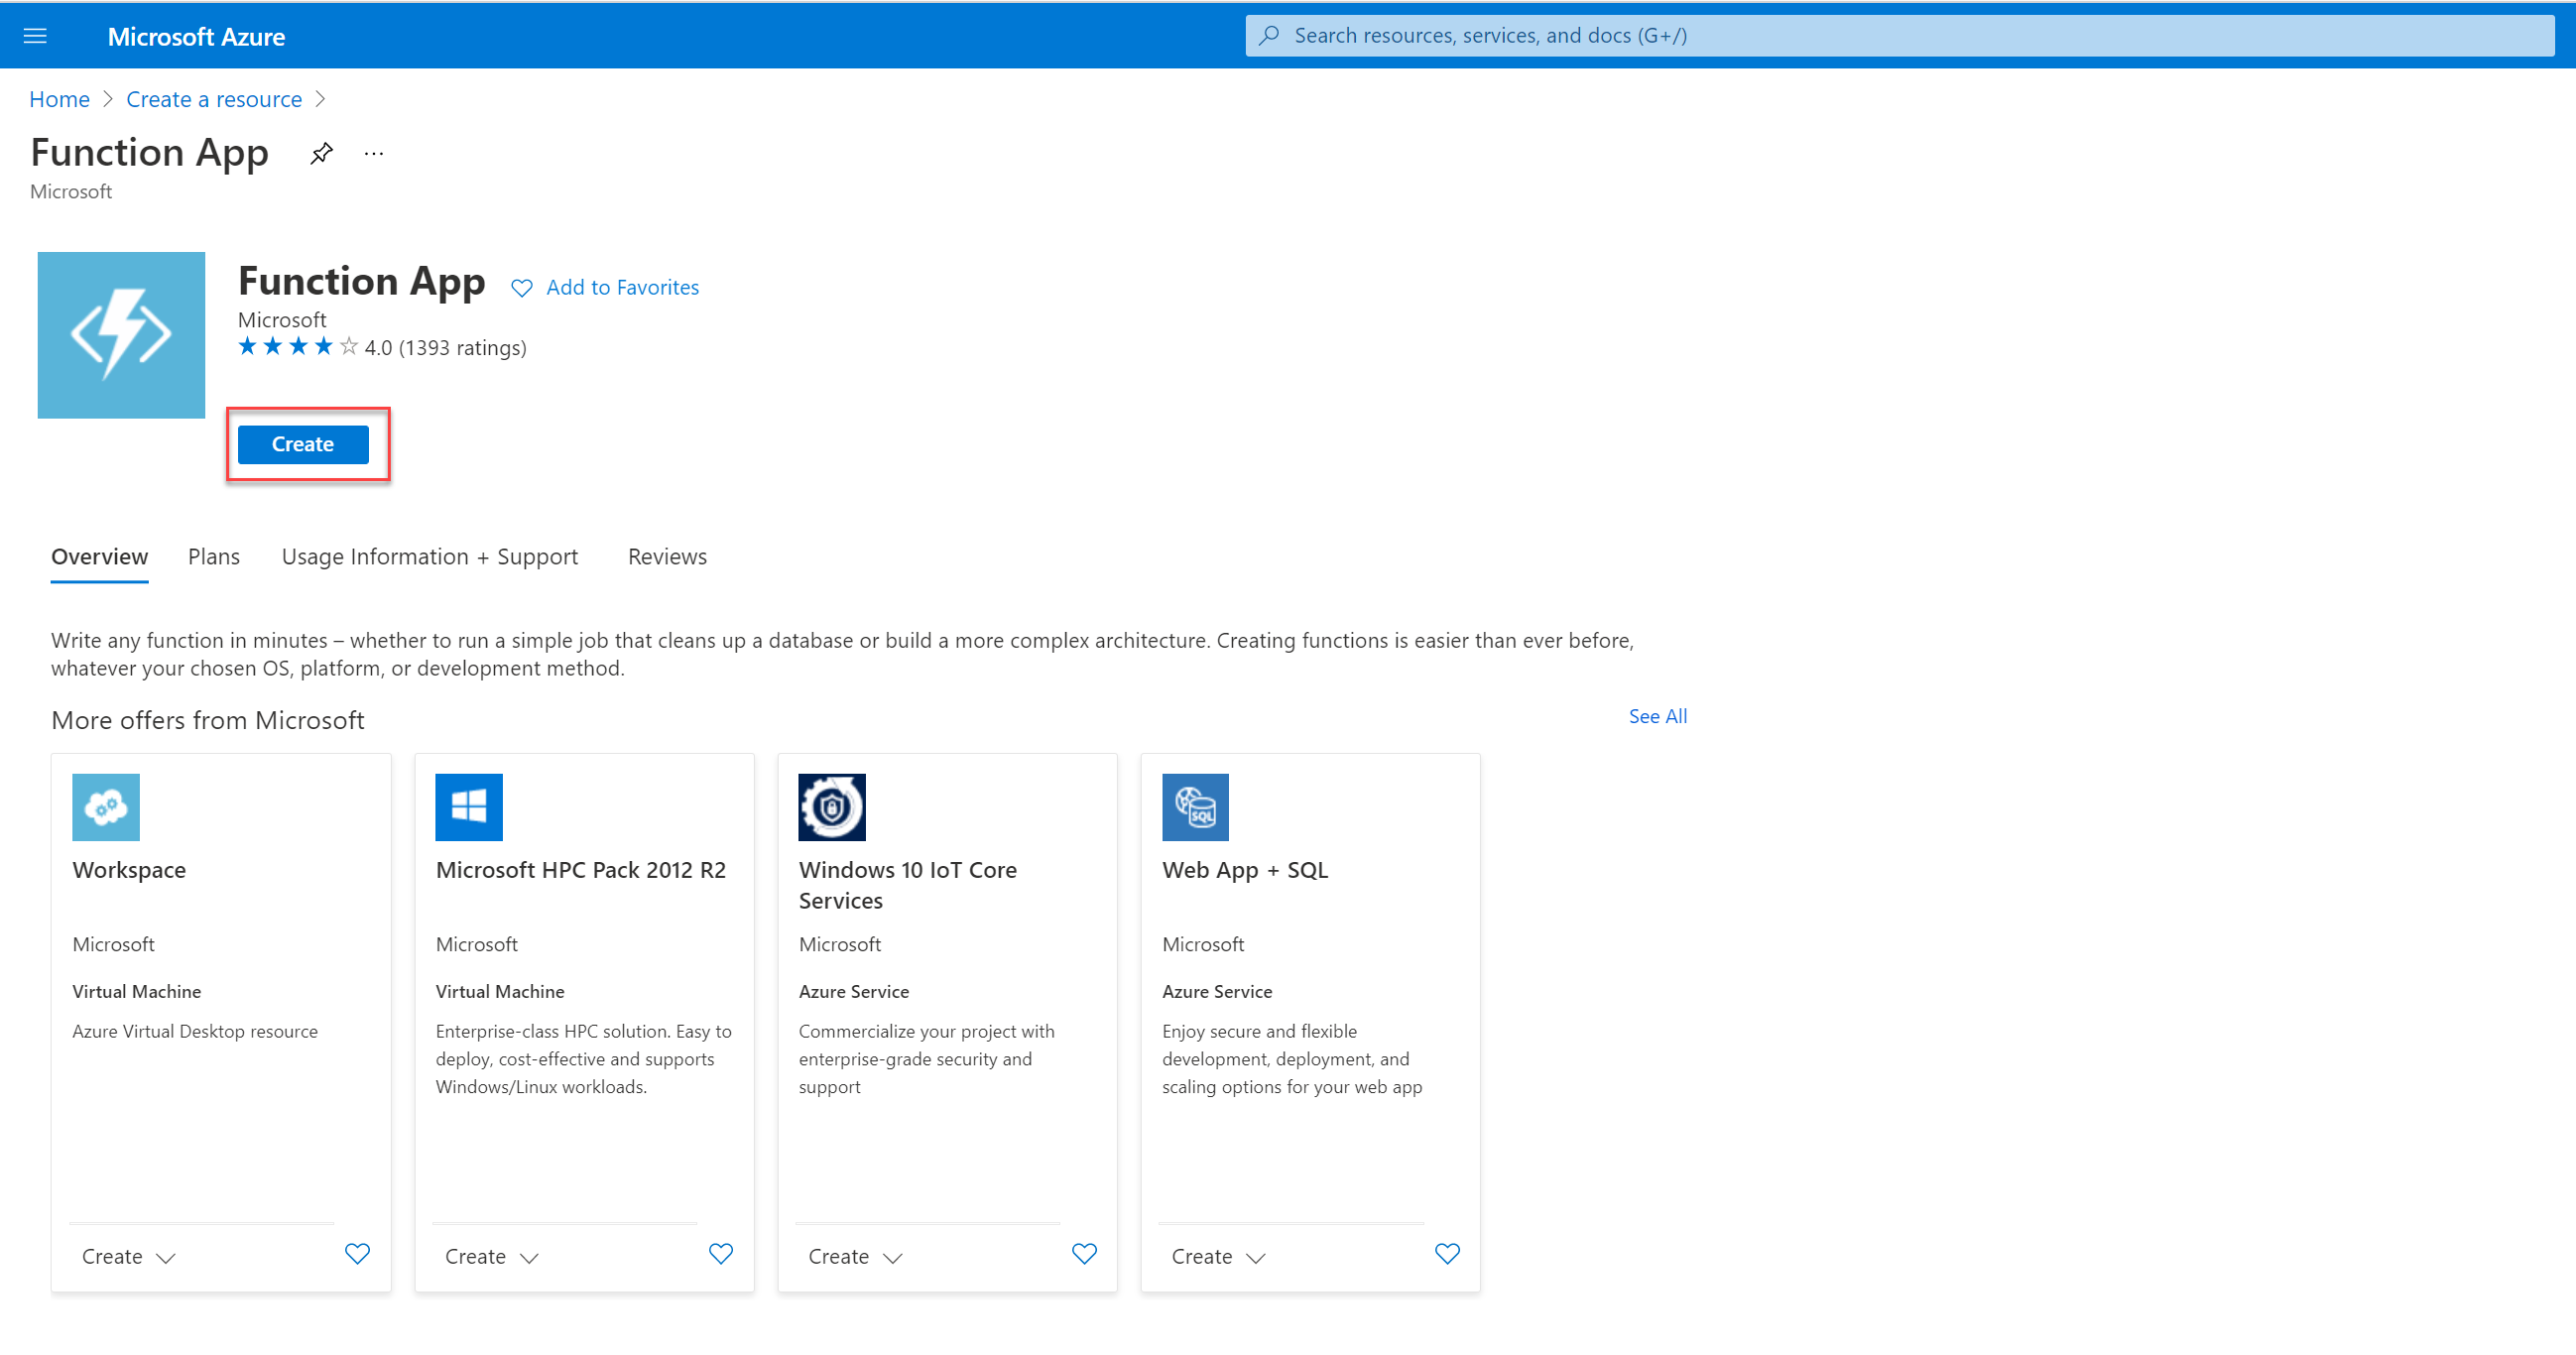
Select Create
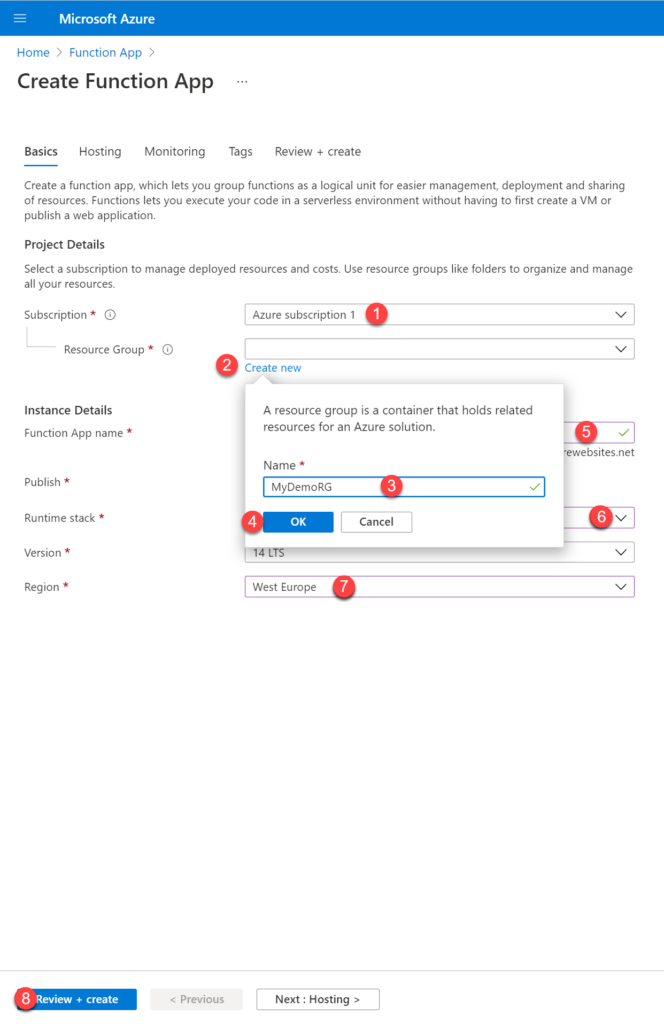
- Fill out the form:
- (1) Select your Azure subscription
- (2) Select Create New to create a new Resource Group where our Function app lives in
- (3) Type in the name of your new Resource group
- (4) Select OK
- (5) Give your app a name
- (6) Select Node.js as Runtime stack
- (7) Select your Region
- (8) Select Review + Create
you can now review everything - as a last step
- Select Create
It will take a few seconds for Azure to deploy your Resource group and the Function App. You will be notified when everything is ready for you.
As an alternative, you may want to create your Azure Function from within Visual Studio Code:\
Creating the Azure Function in Visual Studio Code
Please follow these steps:
- Install the Core Tools package with
npm install -g azure-functions-core-tools@3 --unsafe-perm true - Install the Azure Functions extension for VS Code
- Select New Project
- Select a folder for your project
- Select a language
- Select HTTP trigger as a template
- Type in a better name, like SampleTexts
- Select Authorization level Function
- Select how you want to open your project - I prefer Add to workspace
You will now see your Local Project in the pane.
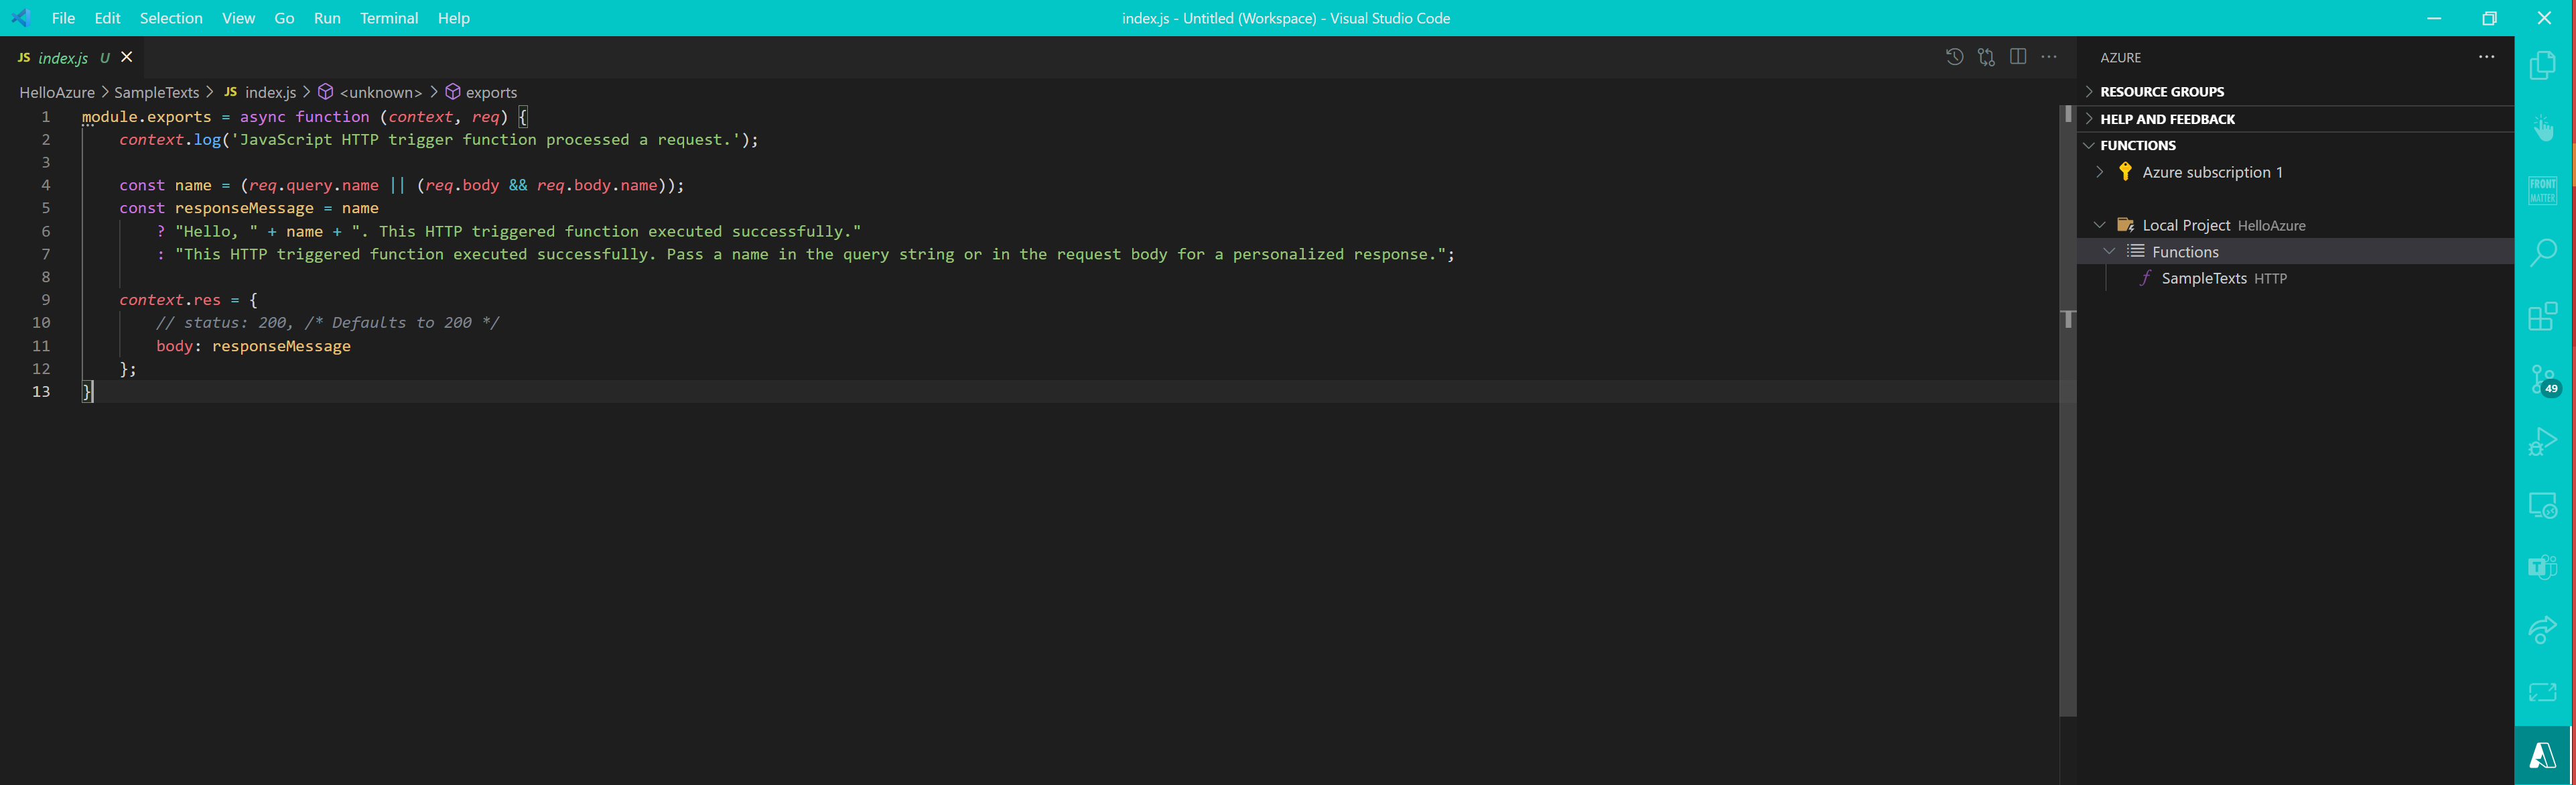
You can now develop, debug and test your function locally and have source control of your code . I like this way more than jumping back and forth in the different blades of the Azure portal - also, I rely on IntelliSense pretty much ¯_(ツ)_/¯
To deploy your function app, select the **deploy **icon. If you are not already logged into your Azure account, a browser window will pop up and ask you to sign in with your credentials.

Once you selected the deploy icon, you need to specify the function in Azure and need to confirm that you know what you are doing 🙂
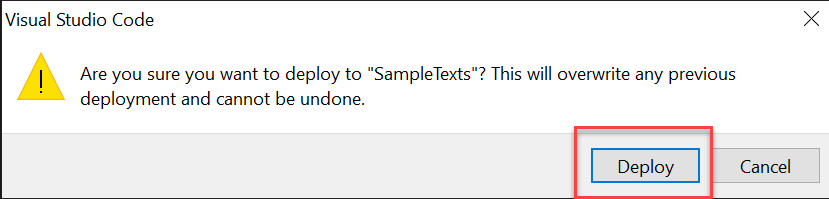
Azure needs again a few seconds to deploy and Visual Studio Code will let you know once this is done ✅

Twilio
Before we add a function and some code to it, let’s understand first what we will be doing: We want to automagically send a text message to our own phone number. We do this by using our brand new Twilio account and log in with our account SID and an Auth token. We will also need our own phone number and the trial number we got from Twilio. As we do not want to hard-code these credentials, we will store them in the Function app configuration and refer to the configuration in our code. In a second scenario below, I will show how to store the credentials even more secure in an Azure Key Vault. But first, head over to Twilio, create an account and get a trial number. Your Twilio Dashboard should look a little like this:

- Copy Account SID
- Copy Auth token
- Copy your Trial number
- Have your own phone number present
We will need these values in a moment!
Azure Function App configuration
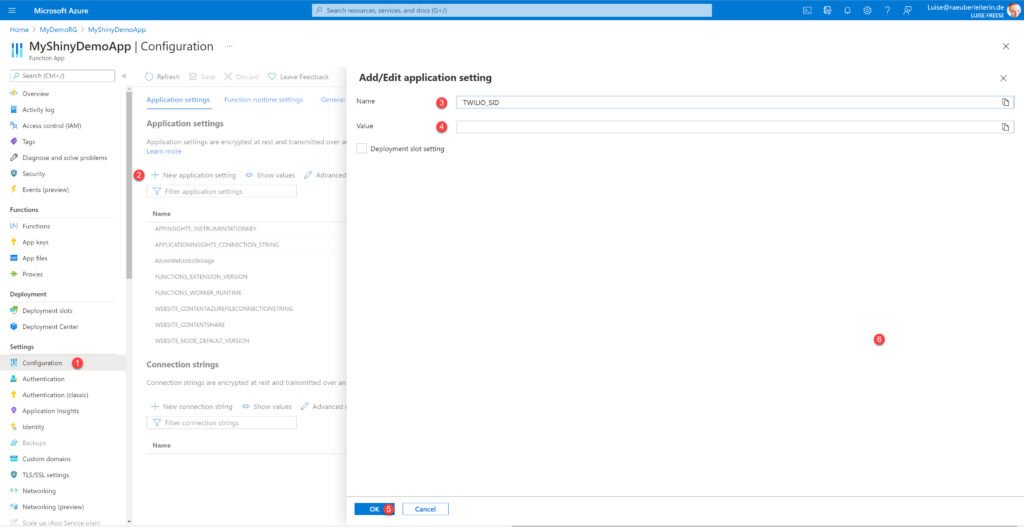
Head over to your Azure Function App
- (1) Select Configuration
- (2) Select New application setting
- (3) Type in TWILIO_SID as name
- (4) Paste in your copied Account SID as the value
- (5) Select OK
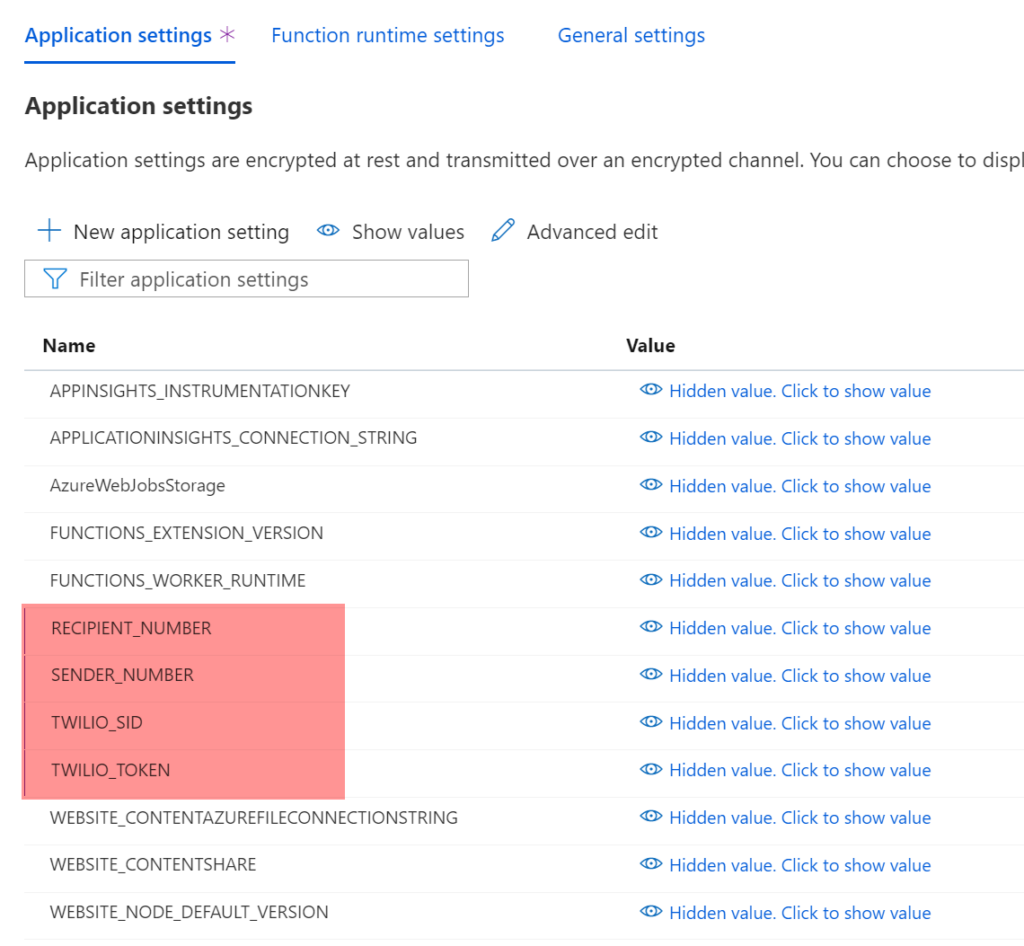
Repeat step 1-5 from above for
- TWILIO_TOKEN
- SENDER_NUMBER (your Twilio trial number)
- RECIPIENT_NUMBER (your phone number)
Hit save Your App setting should now look like this:
Azure Function App -add function
Now its time to add some functionality to our app:
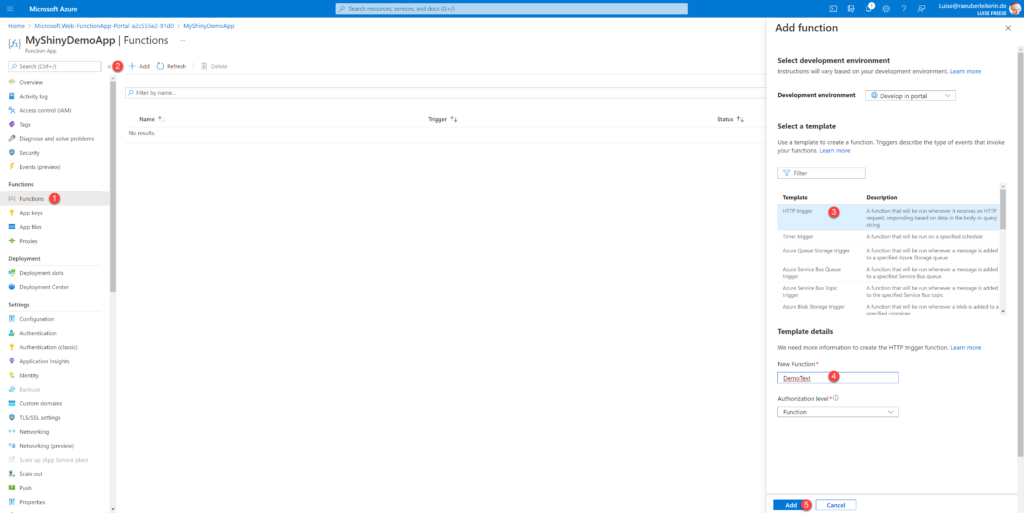
- (1) Select Functions
- (2) Select Add
- (3) Select HTTP trigger
- (4) Type in a name
- (5) Select Add
- (1) Select Code + Test
- (2) Delete the sample code in the index.js file
- (3) Paste in the following snippet:
- (4) Don’t forget to hit the save button - I always do ¯_(ツ)_/¯
const accountSid = process.env.TWILIO_SID;
const authToken = process.env.TWILIO_TOKEN;
const client = require("twilio")(accountSid, authToken);

module.exports = function (context) {
  client.messages
    .create({
      from: process.env.SENDER_NUMBER,
      body: "Woohoo- it worked!",
      to: process.env.RECIPIENT_NUMBER,
    })
    .then((message) => {
      context.log("Message sent");
      context.res = {
        body: "YAY it worked - girl check your phone ",
      };
      context.done();
    })
    .catch((err) => {
      context.log.error("Twilio Error: " + err.message + " -- " + err.code);
      context.res = {
        status: 500,
        body: `Twilio Error Message: ${err.message}\nTwilio Error code: ${err.code}`,
      };
      context.done();
    });
};
Please note
- how we refer to the app configuration settings with environment variables - If this is your first Azure Function app, I can highly recommend that you have a look over here: JavaScript developer reference for Azure Functions | Microsoft Docs
- that we of course want a success (for status 200/default) or error message (for status 500)
- More information on how to work with Twilio - including code - How to Send an SMS with Node.js (twilio.com)
Now Select Overview and then Get Function URL - copy the URL- we will need this in the next step.
Azure Logic Apps workflow
Let’s now have some more fun in Azure and use a Logic Apps workflow to trigger our Azure Function. We will first add a Logic App to our resource group and then define a workflow within that app. We will cover two options how to call our Azure Function, option A with the built-in ‘Call an Azure Function’ action and as option B with an HTTP action. In both cases, navigate to your resource group>
- Select Create a resource
- Search in the search box for Logic App
- Select Logic App from the results
- Select Create
Now fill out the form as follows:
- (1) Select your Azure subscription
- (2) Select your Resource Group
- (3) Type in a name
- (4) Select your region
- (5) Select Review + Create
You can now review your input - when everything looks OK, then select Create
Azure will need a few seconds to deploy your brand new resource and notify you once this is completed. Once this is done,
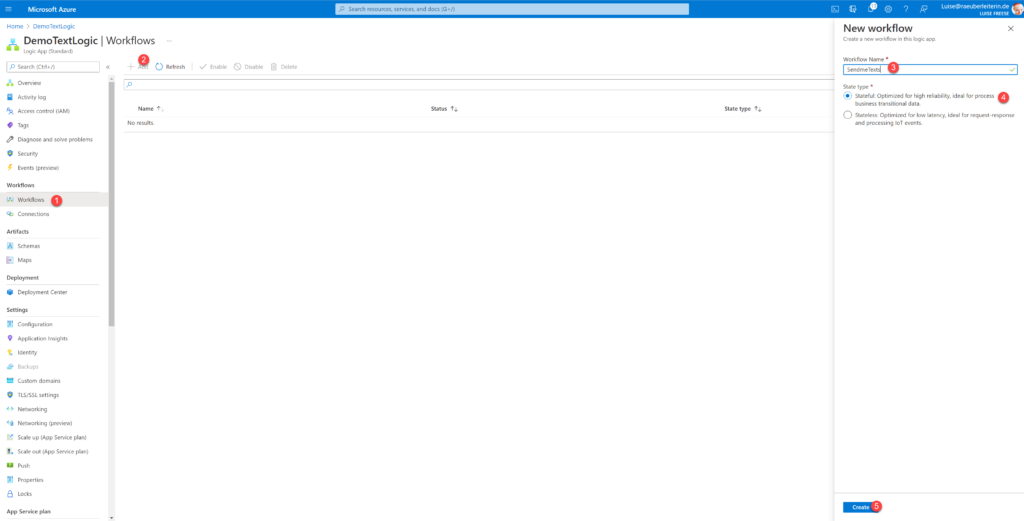
- (1) Select Workflows
- (2) Select Add
- (3) Type in a name for your workflow
- (4) Select Stateful
- (5) Select Create
Now select your new workflow and follow these steps:
- (1) Select Designer
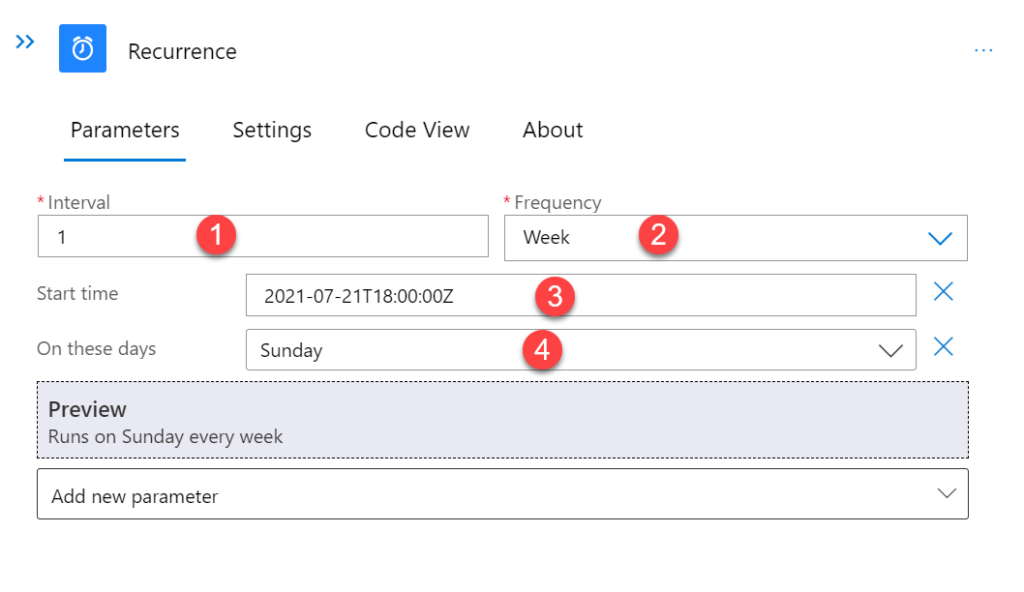
- (2) From the left hands pane, select Recurrence as a trigger
- (3) Fill out the form as follows for a weekly reminder on Sundays (as an example) by adding parameters Start time and On these days - For testing purposes I’d choose a higher frequency 🙂
as stated above, there are (at least) two ways to call our Azure function, this is:
Option A with the built-in ‘Call an Azure Function'
- Select the + icon in the designer
- Select Add an action
- In the left hands pane, search for Azure Fun
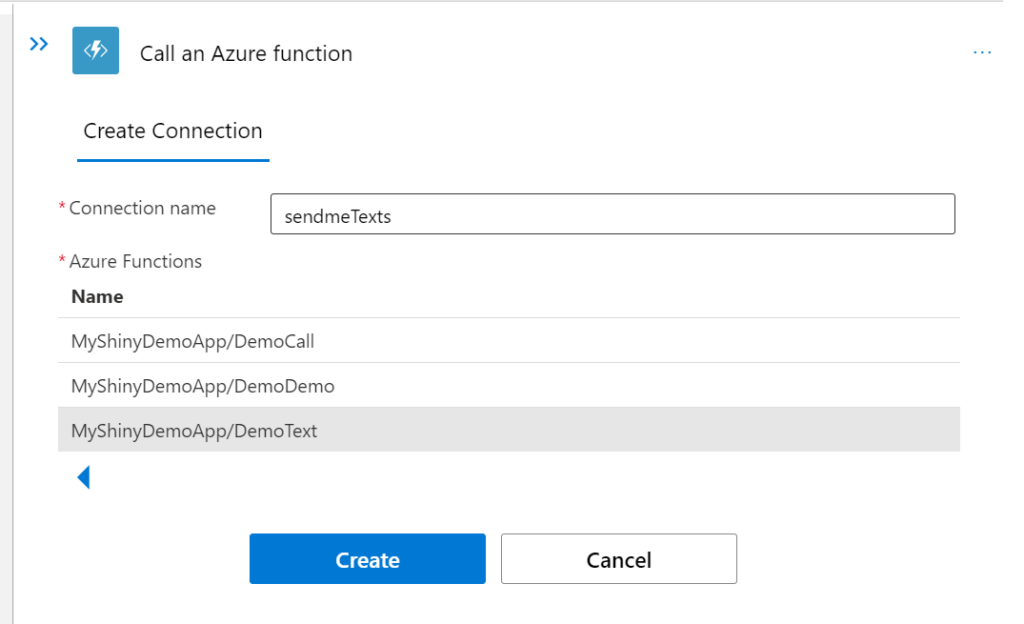
- Select Call an Azure Function
- Select your Azure Function App
- Give your connection a name
- Select the function within your Functions app
- Select Create
- Select Get as Method
- Save your app.
- Select Overview
- Select Run Trigger
- Select Run
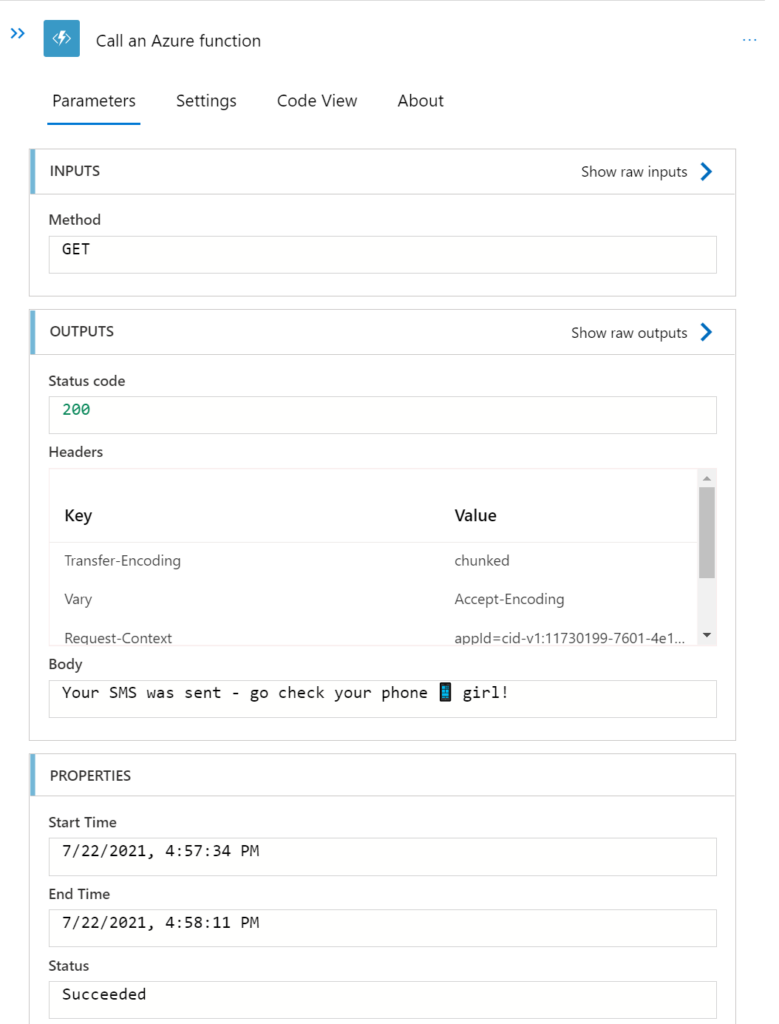
Note the custom output body that we defined in our Azure Function
Now let’s discover the other option to call our Azure function:
Option B with the generic HTTP action
Create your workflow as above, but instead of searching for Azure Fun, search for HTTP
- Select HTTP
- Select Method GET
- Enter the copied Azure functions URL as URI
- Save your workflow
Once again, you can see the outputs of your workflow run ✅
![]()
Next step, makes this even more secure by storing our Twilio token and the Twilio SID in an Azure Key vault so that we can refer to it in our app configuration.
Azure Key Vault
Head over to your Resource Group
- Select Create a resource
- Search in the search box for Key vault
- Select Key Vault from the results
- Select Create
Now fill out the form as follows:
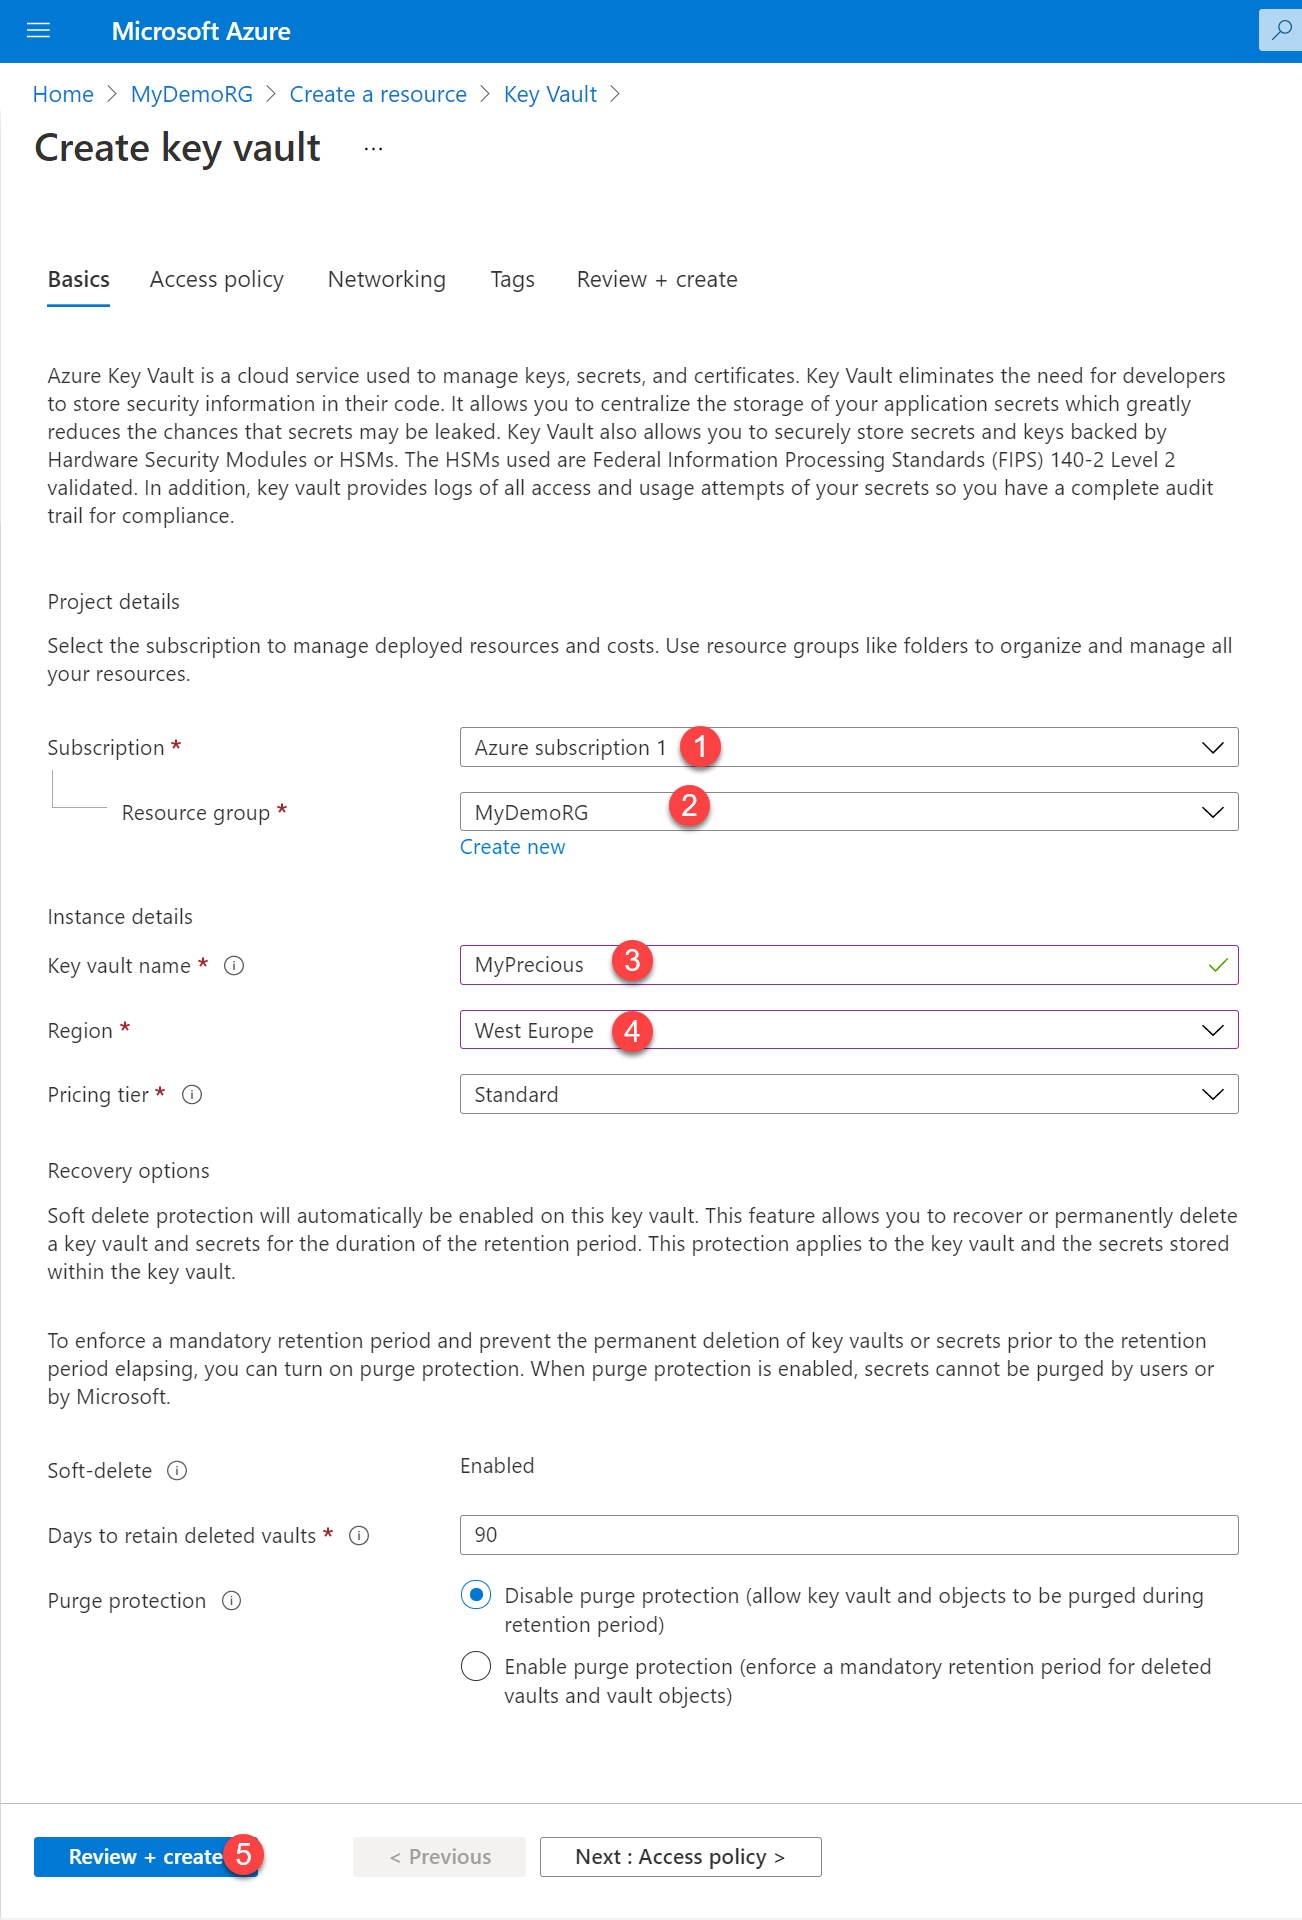
Review and select Create.
It will take a couple of seconds again for Azure to deploy your resource and you will be notified once the Key vault is ready for you.
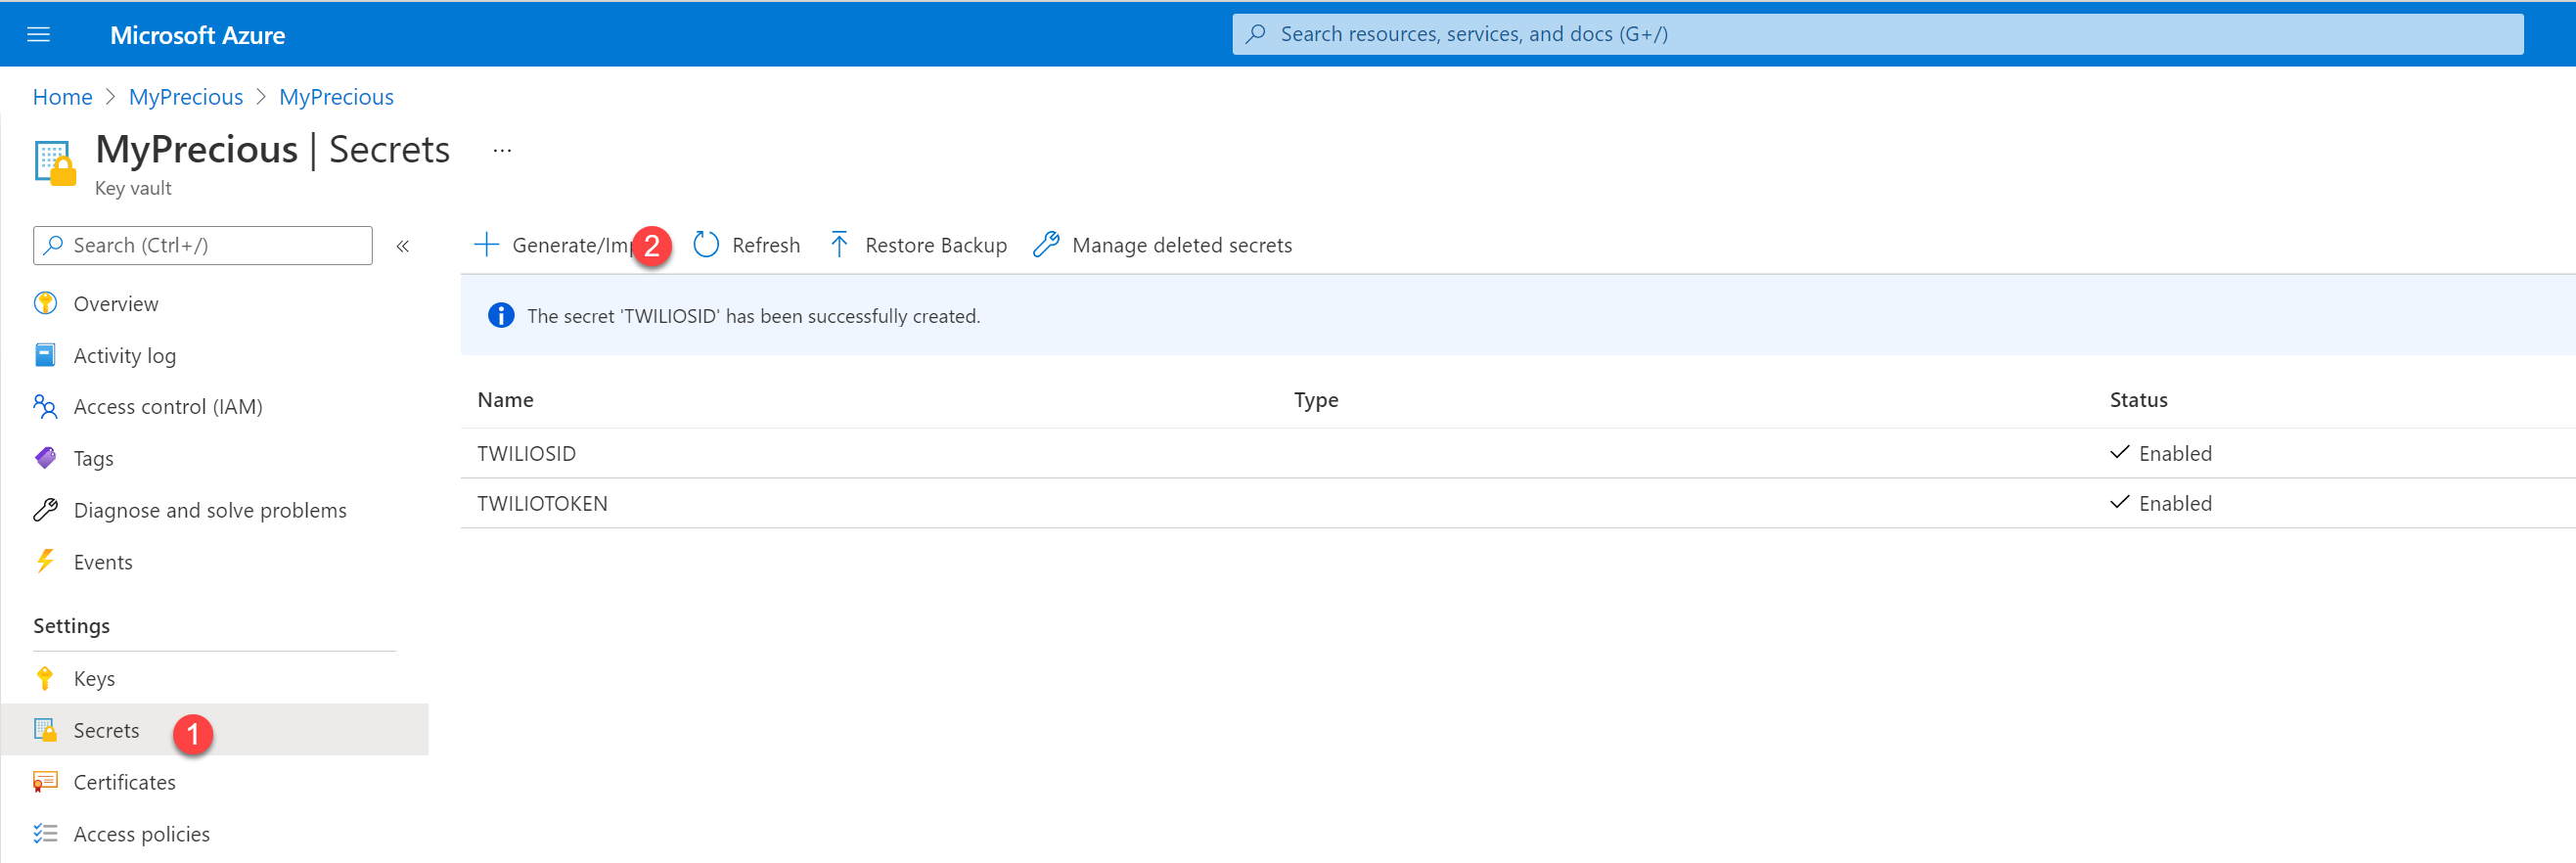
In our shiny new Key Vault, we need to store the key/value pairs for both Twilio SID and Twilio Auth Token:
- (1) Select Secrets
- (2) Select Generate/Import
- Fill in the form as follows:
- Name: **TWILIOTOKEN **(watch out, no underscores allowed)
- Value: the copied Twilio token value from your Twilio dashboard
- Select Create
- Repeat for TWILIOSID
We will use these two secrets later again in our Azure Function, but to make this work, we first need to enable system-assigned Managed Identity to it and then add an access policy for our function app. If you never heard about that, Yannick Reekmans blogged a series about secretless applications.
Head over to your Function app again and
- (1) Select Identity
- (2) Switch the Status toggle to On
- (3) Select Save
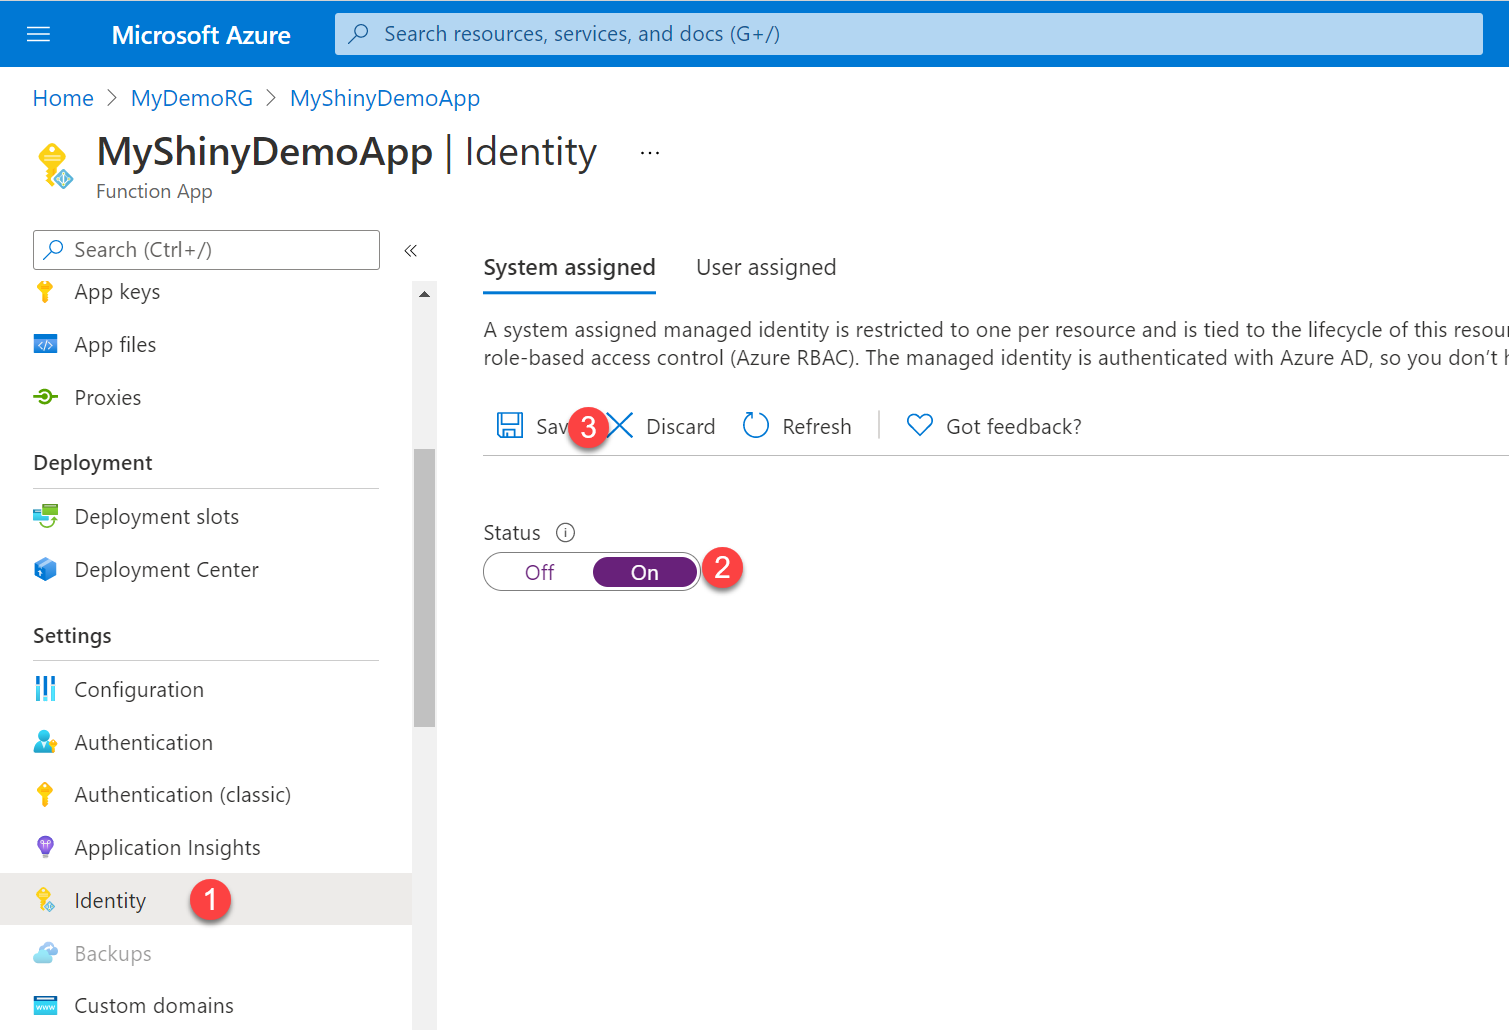
A Pop-up displaying the following message appears, select Yes

Now we will add the access policy to our Key vault so that our function may read the secrets. Head over to the Key vault and
- (1) Select Access policy
- (2) Select Add Access Policy
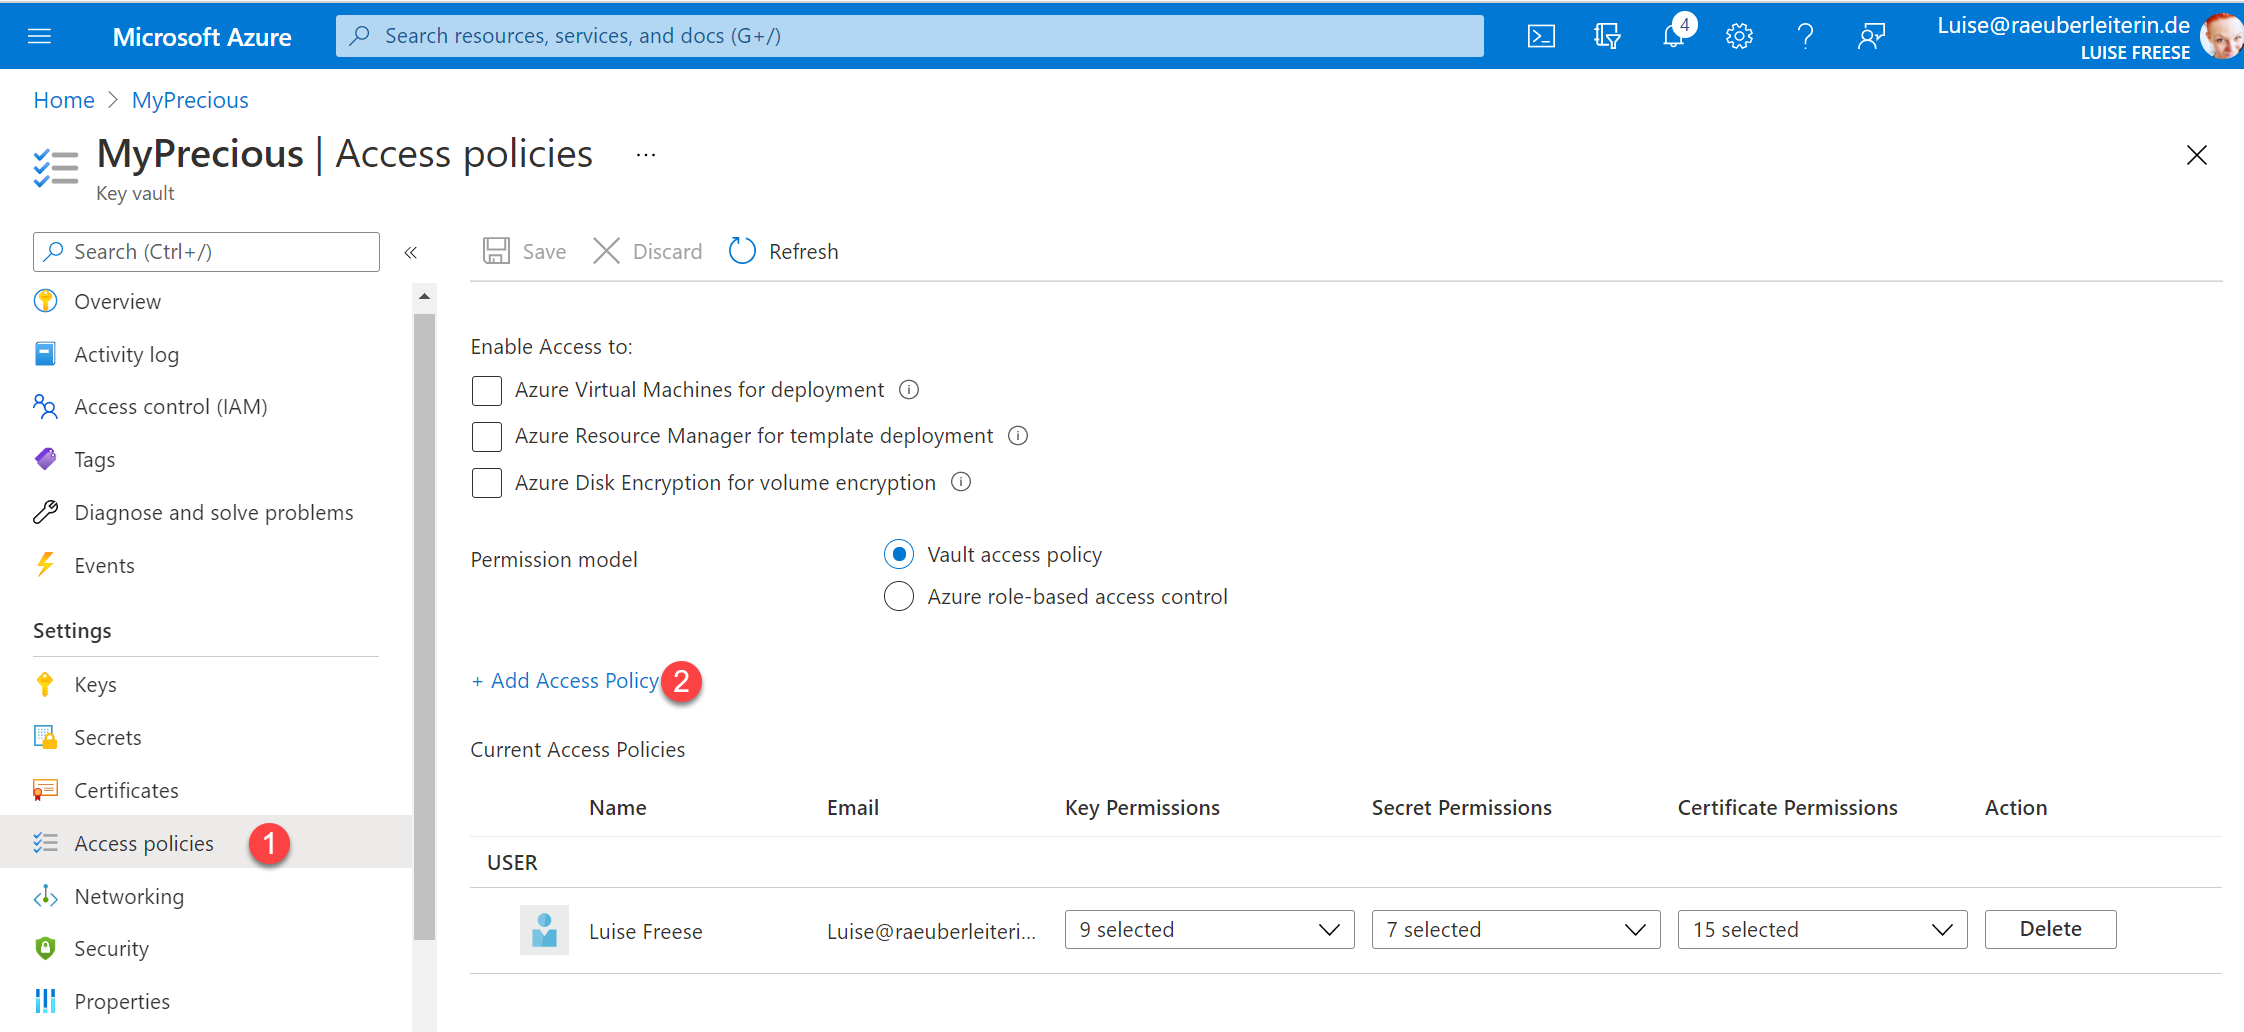
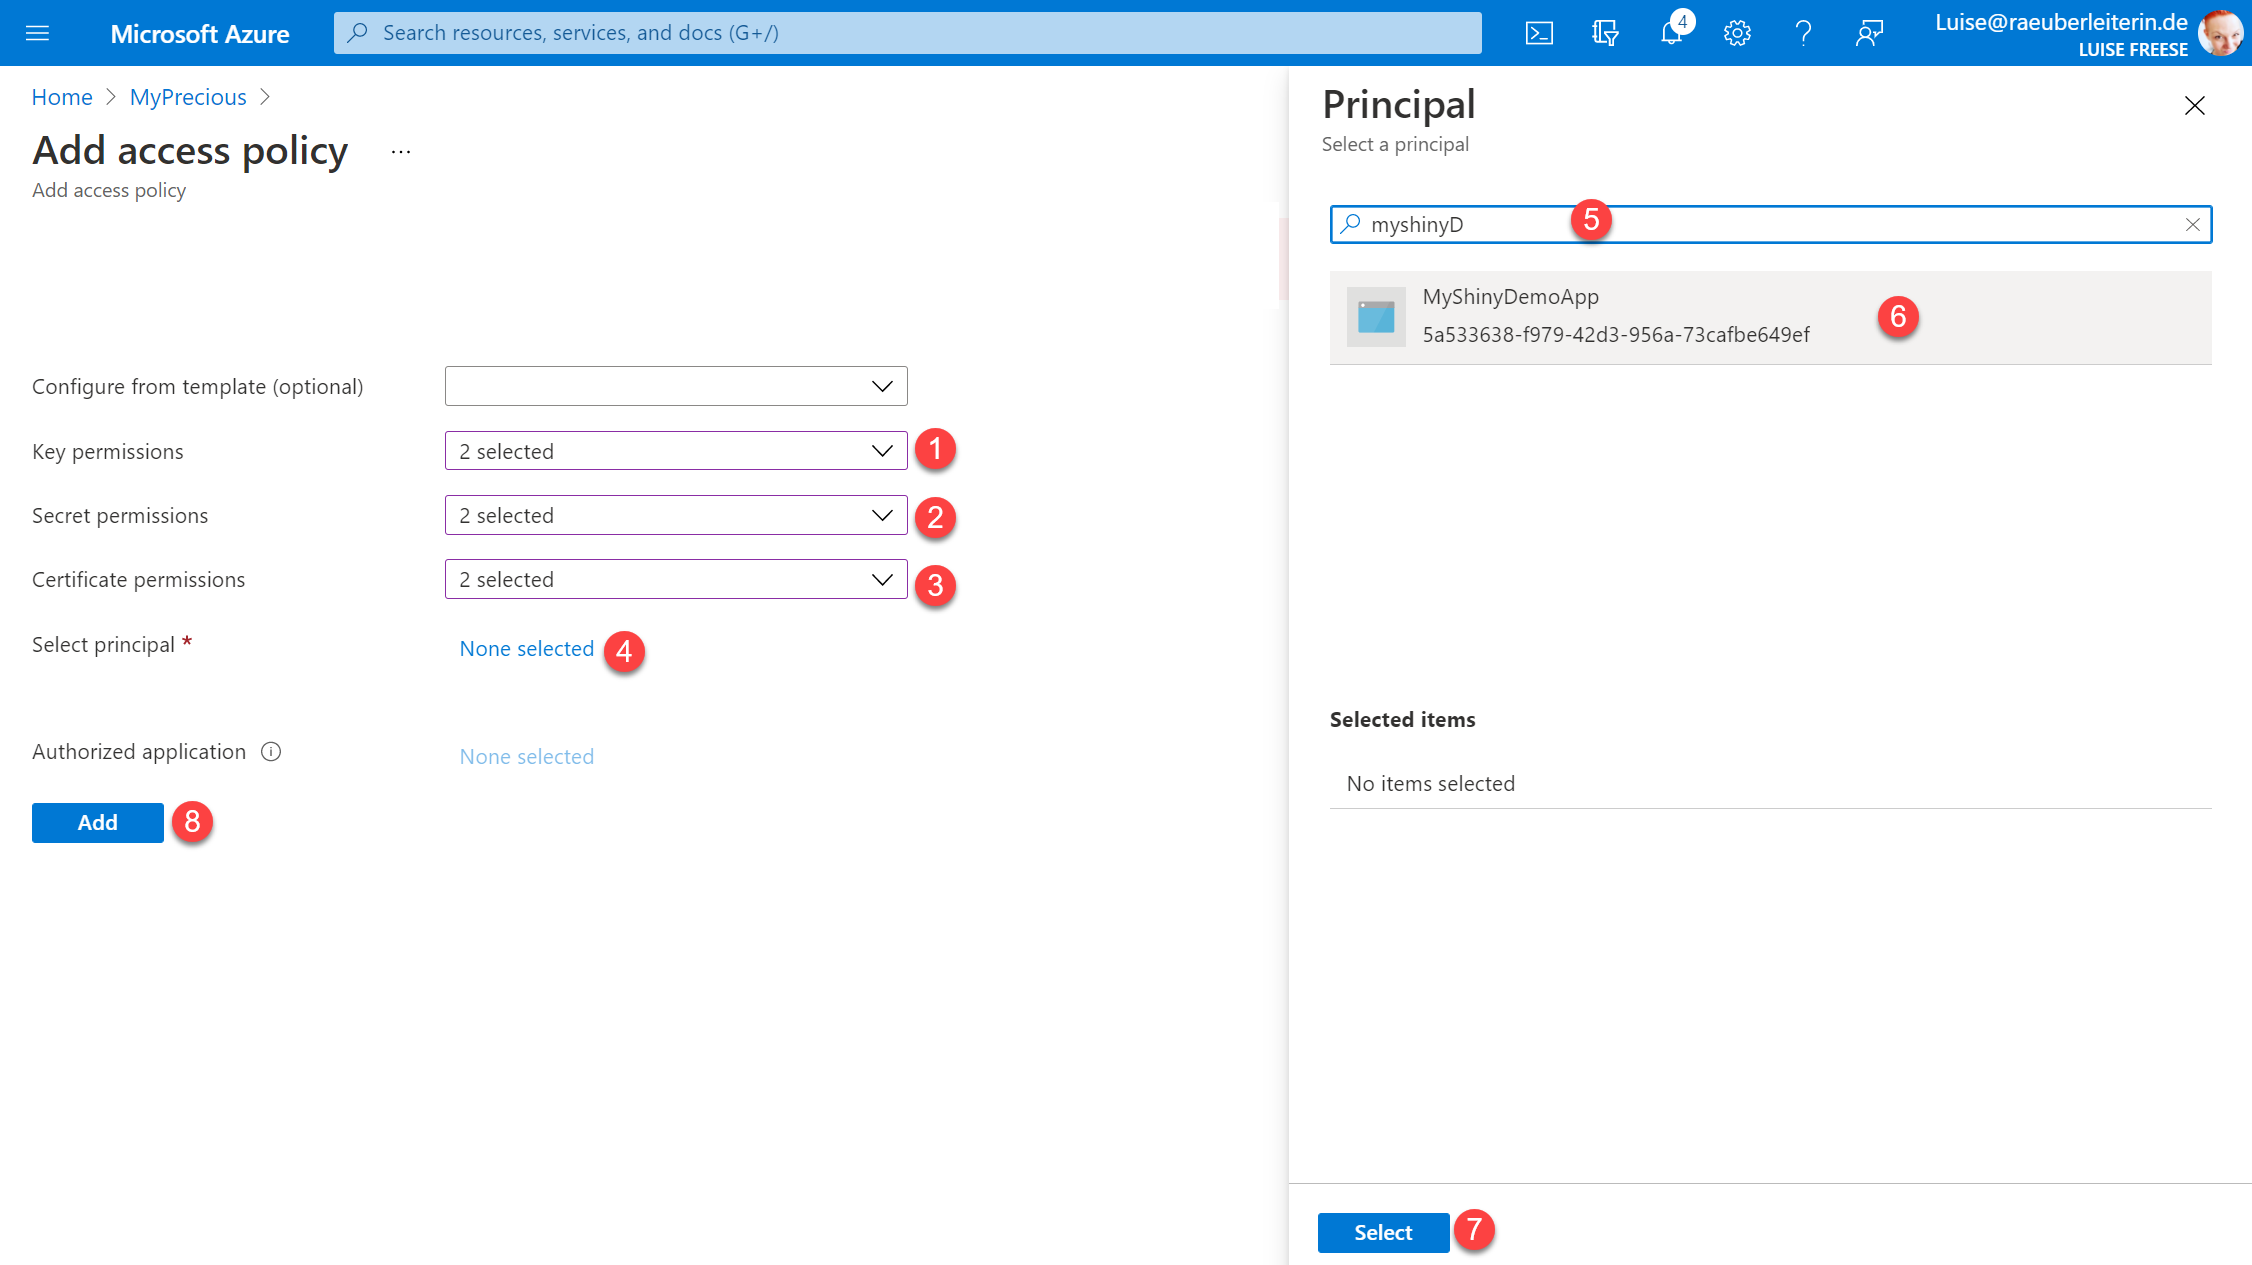
Now fill out the form as follows:
- Key permissions: Get and List
- Secret permissions: Get and List
- Certificate permissions: Get and List
- Select principal:
- Search for the name of your functions app
- Select it
- Select Select
- Select Add
- Don’t forget to Save
Now that our function app has permission to read the secrets from our Key vault, we will reference to the secret in the functions app configuration and get rid of the hard coded values in there. For this, we only need the name of our vault and the name of the secrets TWILIOTOKEN and TWILIOSID.
Let’s now add these to the app configuration of our functions app. Head over to the functions app and
- Select Configuration
- Select New Application Settings
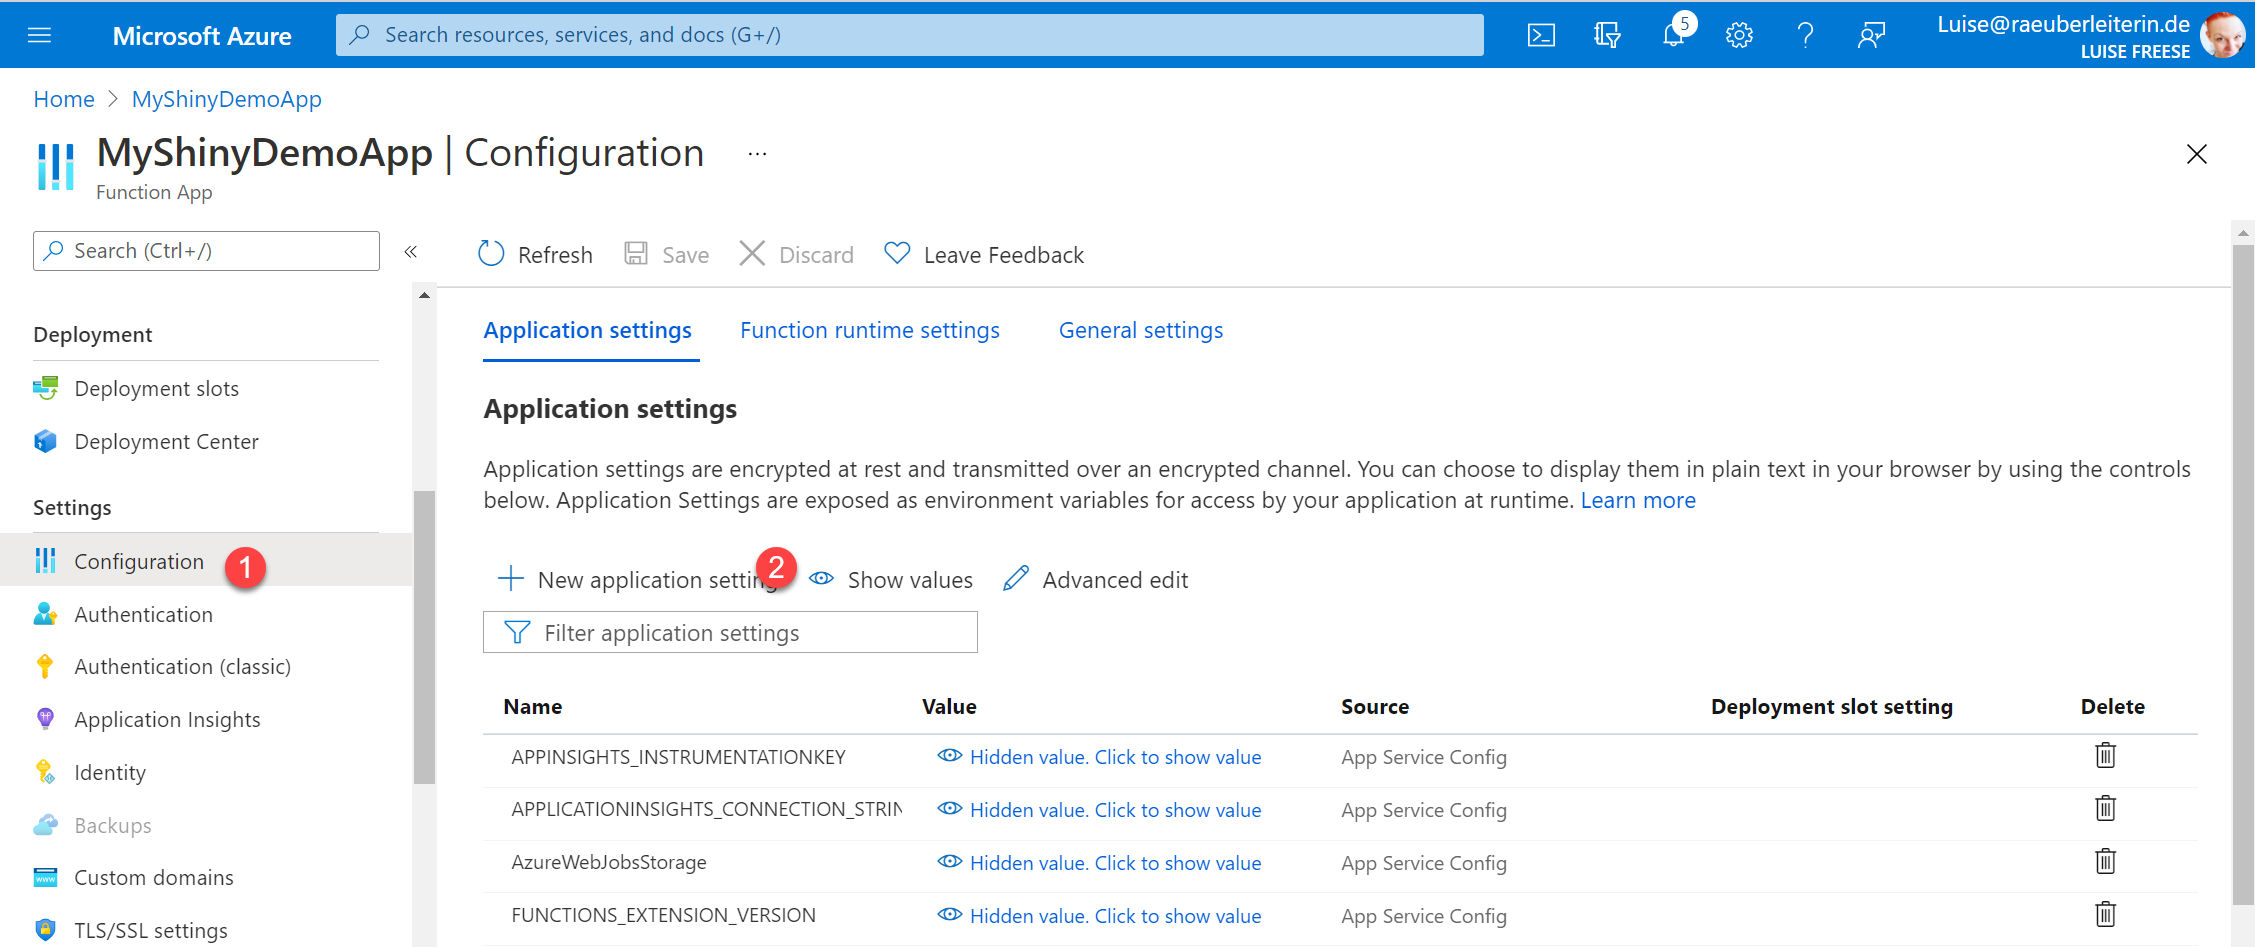
- Fill out the form as follows:
- Name: TWILIOSID
- Value: @Microsoft.KeyVault(VaultName=myvault;SecretName=mysecret)
- Select OK
- Repeat for TWILIOTOKEN
- Don’t forget to **Save
**
Now let’s get rid of our hard coded values in the app configuration to clean up things:
Select the Delete icon - please check twice to delete the right settings!
Now we need to make sure that our Azure function looks at the right app settings.
Select Functions
- Select your function
- Select Code + Test
- Replace the old environment variables by the new ones
- Don’t forget to Save
**That’s it - you made it work! And this is the result: **
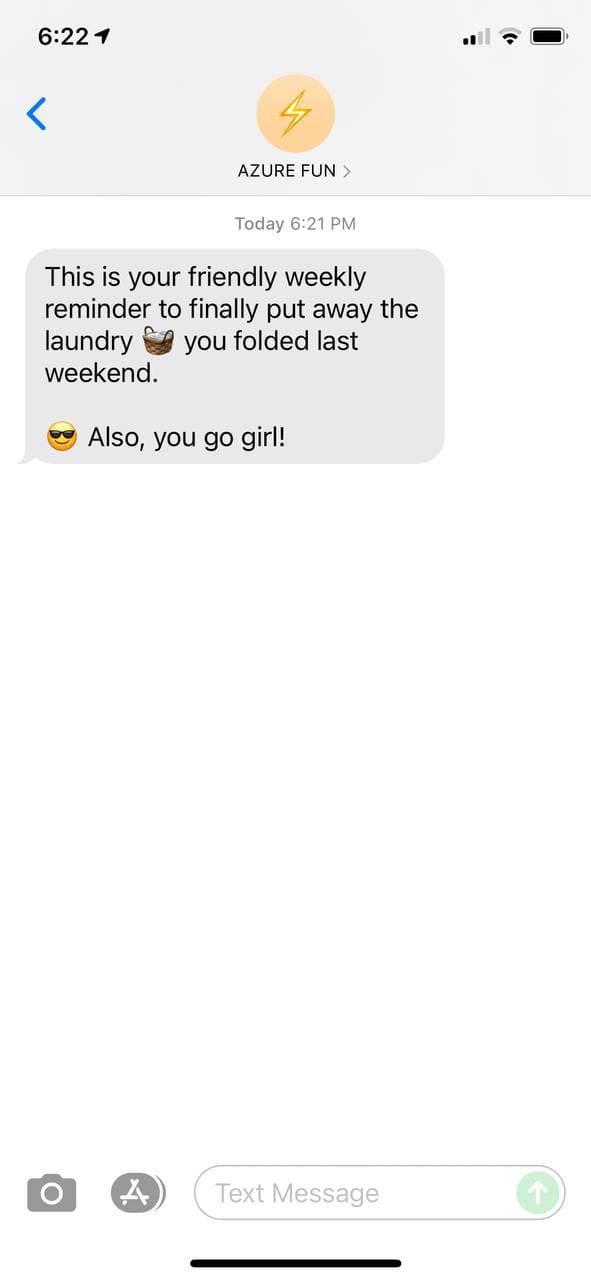
You successfully
✅ created a resource group
✅ build a function app with one function
✅ called an API in that function
✅ stored secrets in a Key Vault
✅ assigned Managed Identity
✅ referenced to your Key vault in your function app configuration
✅ created a Logic app that kicks off the function weekly
Conclusion & what’s next?
Both approaches low code (Logic Apps) and Code (Azure Functions) tie in nicely together. Some thoughts though for everyone who wondered:
- yes, you could get the same result with about 42 other approaches - there is no THE right way to do it
- yes, you can replace the the Logic App with a Power Automate flow - which comes with some disadvantages:
- the HTTP action requires a premium license
- you can’t easily monitor your entire solution in Azure as your flow would now not live in your resource group anymore
- your flow would run in a user’s context - or would need a service account ( MFA)
- you can’t easily templatize and deploy and redeploy your entire solution anymore as the flow is not part of your resource group.
- no, I did not want to use the Twilio connector in Power Automate or in Logic Apps which allows to send SMS without a single line of code - I was looking for a well documented service outside of Azure to showcase that we can call any API in Azure Functions. If you want to level up:
- the amazing Chloe Condon delivered a session on IOT and Azure Functions, watch the video here
- yes, you can do all of the above in Azure CLI as well, to get you started, please read here: Azure Functions | Microsoft Docs
You have a more fancy use case? Let me know about it! Just imagine that we can integrate other services/data in Azure and/or Microsoft 365 and beyond - and decide if we want to do this in a low code or code manner.
In my next post I will show how to templatize and deploy a solution.

My name is
Luise Freese
You May Also Like
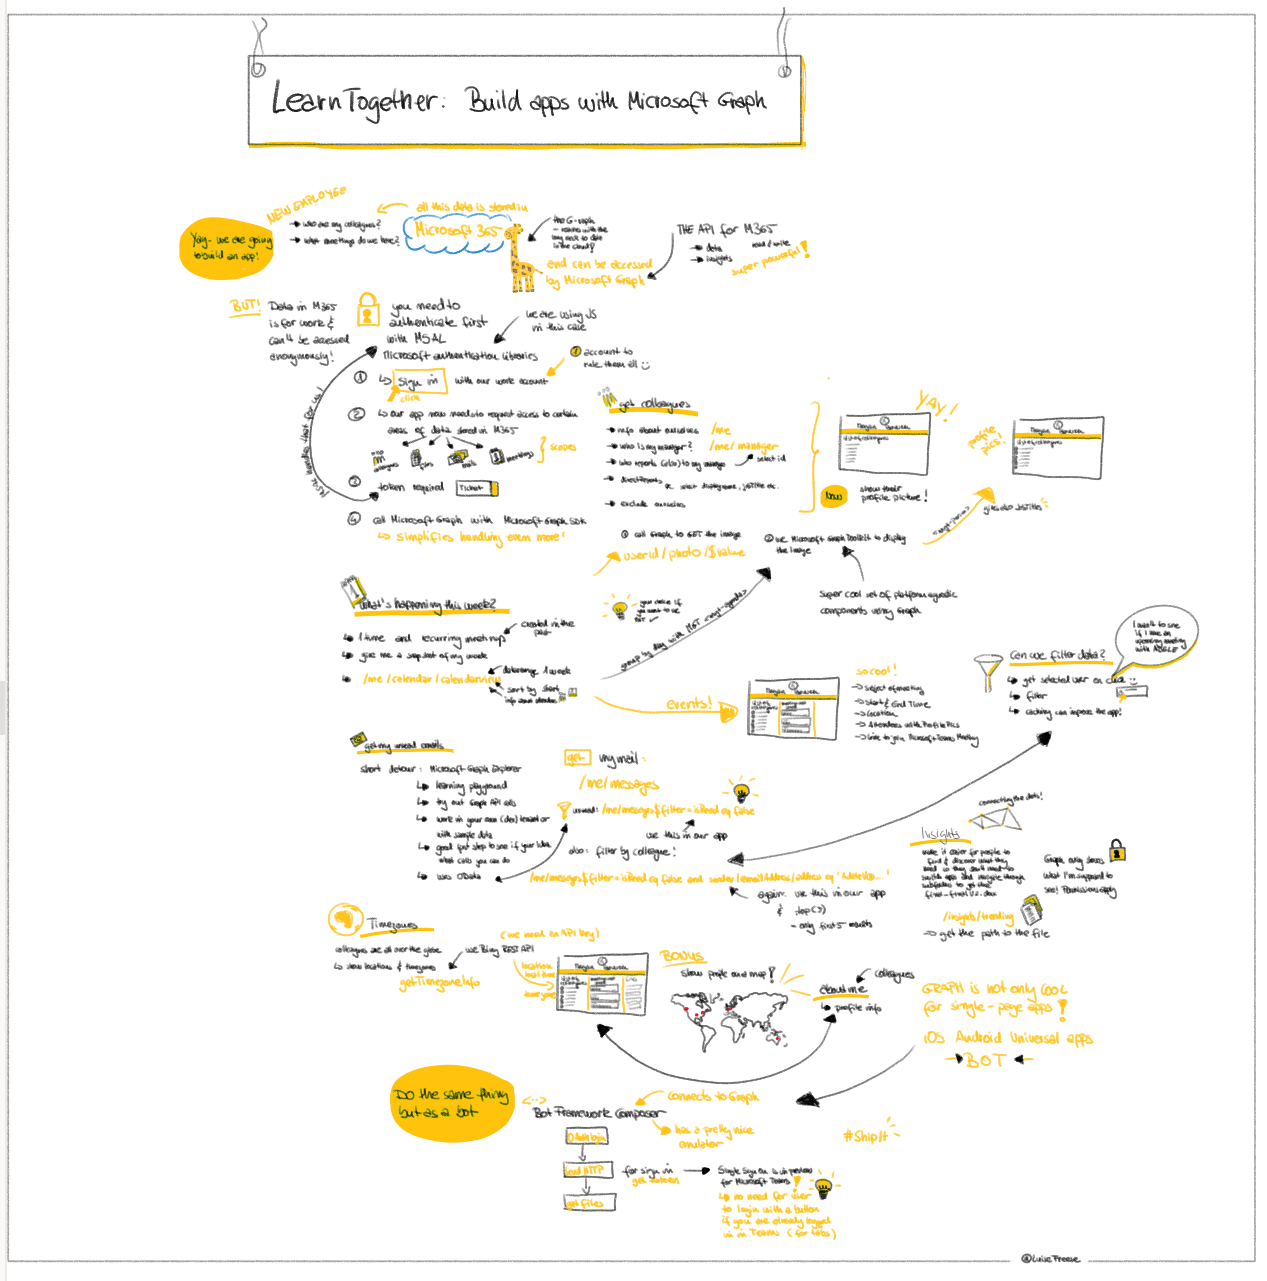
LearnTogether: Build Apps with Microsoft Graph
This week, I had the great pleasure to attend Microsoft’s Learn Together: Build apps for Microsoft Graph event. I also did sketchnotes of the event, you may find high resolution files (images, gifs …

Microsoft Graph Fundamentals learning path – Module 3
Doing Microsoft Graph Fundamentals learning path on MS Learn - Part 3 This is already the third part of my little series on what it takes to do the Microsoft Graph Fundamentals Learning Path on …

Microsoft Graph Fundamentals learning path – Module 2
Doing Microsoft Graph Fundamentals learning path on MS Learn - Part 2 Welcome back to my series about the Microsoft Graph Fundamentals learning path on Microsoft Learn. This is part 2; if you did not …