
How to get started with CLI Microsoft 365 and Adaptive Cards
How to send Adaptive Cards with CLI Microsoft 365
In this blog post I want to explain how you can send an Adaptive Card with CLI Microsoft 365. I will guide you from zero to hero 🚀, so even if you don’t know anything about the CLI Microsoft 365 or about Adaptive cards, don’t stop reading, you will be able to do that in a few minutes- I promise!
What is CLI Microsoft 365?
Lets first get us all on the same page and clarify, what CLI Microsoft 365 is and why we should use it: It is a CLI (Command Line Interface) which let’s us manage Microsoft 365 from any kind of OS: It doesn’t matter if we work on Windows, MacOS or Linux. Previously, some configurations were only possible by PowerShell for Windows, which limited a lot of admins. But even if you work on Windows and are pretty fine with using PowerShell, CLI might be a nice alternative to try out.
How to use CLI Microsoft 365
I will now describe your first steps:
Install Node.js
To use the CLI MIcrosoft 365, you will need to install Node.js - Please follow these steps:
- go to https://nodejs.org/en/
- download the LTS version of Node.js
- install Node.js
If in doubt, if you have the correct version installed or if you need to use different versions of Node.js, pleas read Use Node Version Manager to develop your SPFx apps by Toni Pohl
Install CLI Microsoft 365
Now that you have Node.js installed, we can continue with installing the CLI Microsoft 365. You can choose any shell you like: If you want to, you can use PowerShell or PowerShell in the Terminal in Visual Studio Code or whatever makes you happy. I like to use the PowerShell terminal in Visual Studio Code, because links render to be clickable and this saves me copy/pasting links into a new browser tab. But if you like to any other shell, that is perfectly fine as well. To install CLI Microsoft 365, run the command:
npm i -g @pnp/cli-microsoft365
In case you wonder:
- the
iis an alias forinstall - the
-gmeans that we want to install this package globally - it will take about 2 minutes
Login
Now that we installed CLI Microsoft 365, it’s time to actually do something here. But before we can get or post anything, we will need to log into our tenant. Pro Tip: You can use your your Developer tenant for this. If you don’t know, what this is, please go read What is a “Dev Tenant” and why would you want one? by Julie Turner. Run the following command:
m365 login
In response you will be asked to open a webbrowser and login with a code. If you are using Visual Studio Code, you can click on the link, please copy the code upfront.

After you pasted the code,
- click Next
- pick an account out of the list of accounts
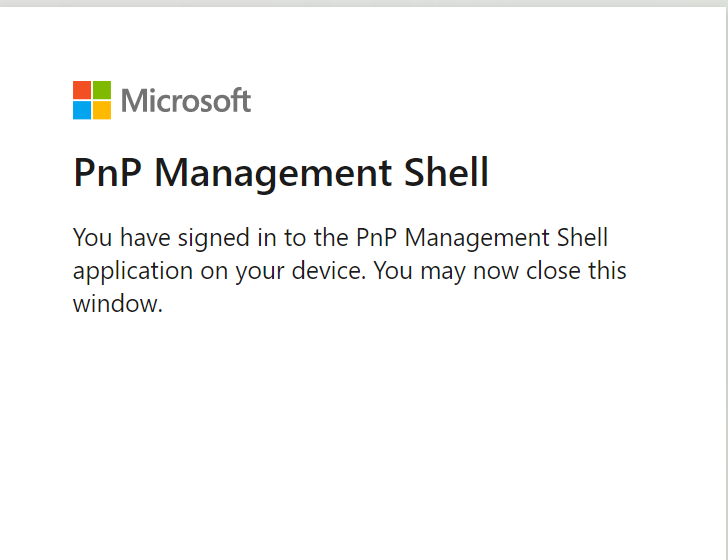
You will be seeing this message and can close this browser tab- we won’t need it anymore.
Yay! You successfully logged in! You don’t believe that? Let’s check with CLI Microsoft 365 and run this command to get your status:
m365 status
and it will get your status for you:

If you want some inspiration, what you could do now, run this command:
m365 help
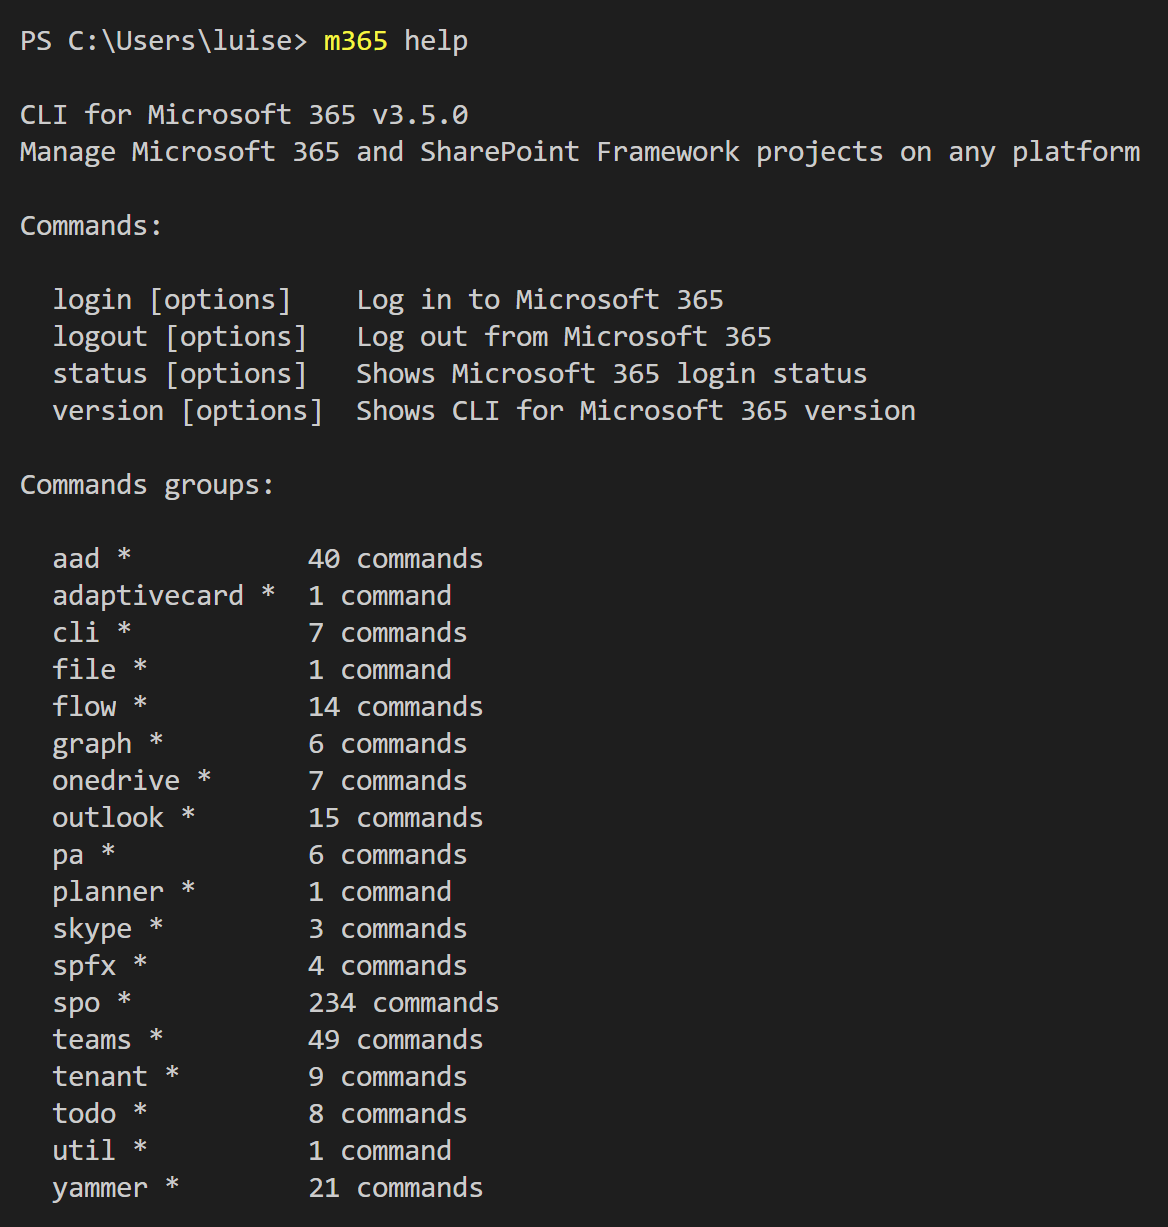 which gives you a list of things you can try, these are called command groups, as each of them can contain several commands. When you now choose one of the command groups and run for example this one:
m365 outlook
you will get the commands, that are available to you in this command group. Sometimes, you can go several levels deep-Just try them out!
What are Adaptive Cards?
Next thing we need to know is, what are Adaptive Cards and why would we want to use them? When we look at adaptivecards.io we can read the definition ‘Adaptive Cards are platform-agnostic snippets of UI, authored in JSON, that apps and services can openly exchange. When delivered to a specific app, the JSON is transformed into native UI that automatically adapts to its surroundings. It helps design and integrate light-weight UI for all major platforms and frameworks.’ This means, that we get a nice method to share and display information without needing to know how to use HTML/CSS to render them correctly in different host applications. If you like to know more, please read Get started with Adaptive Cards by Tomasz Poszytek
How do we send an Adaptive Card with CLI Microsoft 365?
Now that we know what is an Adaptive Card, let’s have a look on how we get this sent by CLI. The documentation provides us with a sample and this sample needs to have a URL. Where do we get this from? This depends on where you want to send this Adaptive Card to. In this example, I want to use Microsoft Teams as host application and therefore we will need to create an incoming webhook in Teams.
Create the Webhook
If you have no clue what is a webhook, no problem, Rabia Williams got you covered with How to configure and use Incoming Webhooks in Microsoft Teams.
- Open Microsoft Teams
- Click the ellipsis icon on the Teams channel that you want to send the Adaptive Card to
- Click Connectors
- Search for ‘webhook’

- Click Add
- Click Add (yes, yet again)
- Give your webhook a name
- If you like to, you can upload a picture- messages sent via this webhook (our Adaptive Card) will have this image then as Profile Pic - this step is optional.
- Click Create
- Copy the generated URL
- Click Done
This URL is the URL we will need in the command later - If you want to, paste it into a notepad or similar.
Author your Card
Now it’s time to author your card. You can do this in a lot of editors, I use either the Adaptive Cards Designer or the Adaptive Cards Viewer Extension in Visual Studio Code, but recently also found Adaptive Card Studio. You can also use one of the provided samples and use them as-is or adjust them to your needs.
If you feel like authoring your Card in Designer or Visual Studio Code is fine for you right now, go ahead with this, otherwise you can also use the examples that are provided in the documentation of CLI Microsoft 365. I used the last one, ‘Send custom card with card data’.
For everyone not very familiar writing and understanding code: We can make more sense of the snippet by copy/paste this into Visual Studio Code, and then press Alt+z to soft-wrap this and then separate the Adaptive Card from the rest:
- Select JSON in Language Mode
- Insert somenew lines right before the first
{ - Delete the
'at the beginning and the end of the snippet - Format with Shift + Alt + f
Now go ahead and adjust the sample to work in your environment:
- replace the URL in the code with the URL that we copied when we added the webhook connector to Teams
- copy the whole code
- run it
⚡ Turned out, that there are some differences how to use quotes ' or " - please consider which shell you are using before you copy/paste the code from CLI Microsoft 365 documentation.
Congratulations 🚀- you sent your first adaptive Card with CLI.
Feedback and what’s next?
I hope you liked this little post on how to get started with CLI Microsoft 365 and learning how to send an Adaptive Card with it. I would like to learn, for which usecases you would do this? Please comment below!

My name is
Luise Freese
You May Also Like

How to get started with HTTP requests in Power Automate
How to get started with HTTP requests in Power Automate If you ever wondered what is an HTTP request and why you would want to know how this works - this post is made for you. What is a HTTP request …

How to use Parse JSON action in Power Automate
How to use Parse JSON action in Power Automate We can see a a lot of JSON in our Power Automate flow run history, and if you wonder, how you can parse JSON to make Dynamic Content (which is …

How to add a simple preview in libraries in SharePoint
#M365Hack - How to add a simple preview in a library in SharePoint After my last #M365Hack where I showed you how you can create a Dynamic preview for documents in SharePoint a few people reached out …