
TimeTracking Tool with #PowerPlatform and Adaptive Cards
In this blogpost I would like to show you some easy steps with which you can not only track the time you spend on a project and it’s different tasks, but also share this with team members or even your customer.
A few months ago, I posted my very basic timetracking tool, but as I evolved in my journey and improved my skills, I modified my flows.
What I want:
- Data shall be SharePoint list
- Visualization in Power BI
- two mobile buttons to define start and end of my work
- summing up all the hours I worked on
- inform my customer what I did
SharePoint
Create a list with the following columns
- Title
- Description (single line of text)
- Status (single line of text, default value = open)
- Start (Date and Time)
- End (Date and Time)
- Duration (calculated column, = 24*(End-Start), display as number with 2 decimal places)
- Totals (number)
Power Bi
Create a Streaming Dataset on https://powerbi.microsoft.com (Click on the workspace you want to work in and then click on CREATE in the upper right corner, then Streaming dataset). Now click on API, NEXT.
You will need to give your dataset a meaningful name and define the values. I went for

- workload (text)
- task (text)
- hours (number)
Please set the toggle of historic data analysis to ON and click CREATE.
Now click on DONE.
You can now create a report from this dataset, just click on the little chart icon:
 ## Power Automate
We will need to flows for START and END.
Start flow: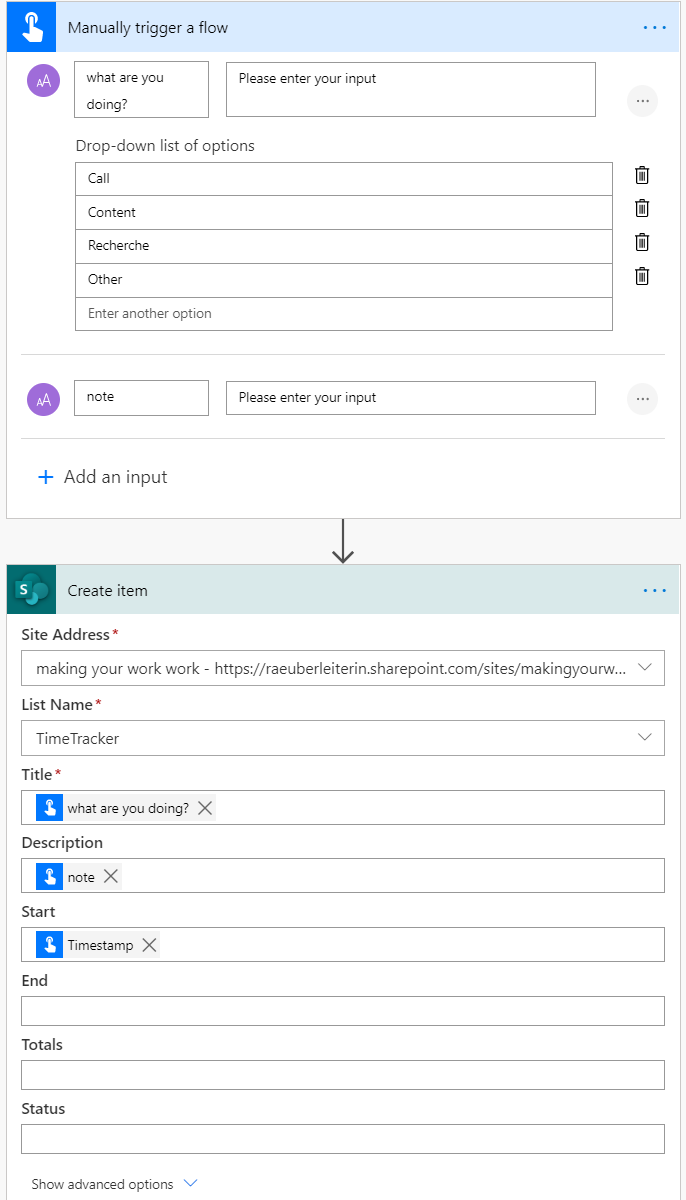 With a manual flow trigger button and 2 fields I kick off my first flow — asking myself on which workload I am currently working on and if I have any notes. I defined a dropdown menu for that so it is most convenient to fill out on mobile 🙂
I just pass this to my SharePoint list and make sure using the timestamp of the button to be in the START column.
But the real magic comes with the next steps 🙂
As I want to give my team colleagues / customer / fellow unicorn a notification, what I do, I thought about a fancy adaptive Card, which gets the input from my SharePoint list and will be posted in Teams 🙂
Adaptive Card
To create your own Adaptive Card, just go to https://adaptivecards.io/designer/, select Microsoft Teams as your host app and make yourself a bit familiar with the card elements. You can open samples to see what is possible or start creating one from scratch. While you are busy with draggy droppy (learned this term at #SS2020 from Scott Durow ) the adaptive Card designer creates nice JSON for you. Don’t worry, if you are not a dev — same here! I learned from Mr. Power Apps in person Keith Whatling, that JSON is just text in curly brackets {}( although I don’t call them anymore ‘curly brackets’ but ‘braces’).
Just understand, that the ACs are just a design schema. You only define the structure, but not the design itself. You can insert text, images, tables in your card and the card will later have the look & feel of the application you post it in — therefore we call it ADAPTIVE.
So just copy /paste the code to your clipboard.
 Insert another action to your flow: Post your own Adaptive Card as the flow bot to a user and replace some of your placeholders with dynamic content from previous steps of your flows. You can also then copy/paste this code back to your AC designer — I really like the experience there is I have a preview how my card looks like. I also tried out the AC extension in Visual Studio Code, it’s pretty neat as well- (Just open Extensions Marketplace and search for Adaptive Card Viewer).
 If you want to learn more about Adaptive cards, here is a link to last year’s #MSIgnite session of Matt Hidinger and Tim Caldenbach — also including a sketchnote I did from this session:
https://developer.microsoft.com/en-us/sharepoint/blogs/adaptive-cards-community-call-november-14-2019/
Also an awesome ressource of incredible in-depth knowledge on that is Tomasz Poszytek.
 Ok, after we made a short tour to Adaptive Cards, we need to take care of our
End Flow
We again start with a mobile button: and insert an action to get the item of our SharePoint list that is still in status OPEN. Remember? Open was our default value 🙂
Now we want to UPDATE ITEM with the timestamp of this button — and we want to change the Status to DONE.
The flow will *automagically* add an APPLY TO EACH.
 **Sums**
As I wanted the sums of my working hours, we need to put in some work on that. Shoutout to Matthew Devaney who introduced me to the float type. (Knew that one in JavaScript, but didn’t think about using it in a flow)
The Problem is: we can’t easily get totals for our calculated column in SharePoint as this is just not a supported feature 🙁
So what we will do is, that we will use the get items action (this time, to get ALL items) and initialize two variables. The First variable CurrentTotal shall be type Float and the value needs to be 0. Without this, it doesn’t work!
 The second variable tempNumber is type String. We will use both variables in the next step:
First, we set the variable tempNumber with our Duration column, then we increment our CurrentTotal variable. For the value just use this easy expression:
float(variables(‘tempNumber’))
Now just update TOTALS column of the list with the CurrentTotal:
 **Visualisation**
Remember our Streaming dataset in Power Bi? We can now easily connect this to our flow. Just insert the Power BI action INSERT ROWS TO A DATASET, choose your workspace, your dataset and fill in TITLE, DESCRIPTION and DURATION from dynamic content.
 ## your mobile phone
If you don’t have the Power Automate app yet on your mobile phone, please install it, log in and refresh the BUTTONS (just swipe down). You should now see your two new buttons — Start and End.
Summary
The Start flow creates a new row in your SharePoint list and sends an adaptive Card to your teammates to inform them what you are currently doing. The End one updates your list, sums up your working hours and passes your data to Power Bi where you can create a nice report from that.
Feedback?!
Did you like this post? Then please let me know and clap for it! Do you have thoughts on that? Or questions? Or do you know other ways to do this?

My name is
Luise Freese
You May Also Like

How to use Power Virtual Agents to simplify IT and unf*ck User Experience
In this blog post I want to show you how you can use the whole Power of the Power Platform to improve user experience, narrow the traditional gap between IT and Business side of a company and simplify …

Adaptive Cards for Beginners- Monitor a Hashtag on Twitter
I wanted to work’n’play with Adaptive Cards, which are the future of notifications and I wanted to experiment with the Flow Bot in Microsoft Teams so I tried to figure out how I could monitor a …

Office 365 as an IT-only project – what could possibly go wrong?!
Note: I did a session with Michael Roth on based on this blog post at #Office365UGHH — please connect with and follow him as well. If you want to run your Office 365 project like an usual IT project …