Manage my Events with Flow across Microsoft 365
I am an Office 365 Consultant, sketchnote artist and speaker in Microsoft Tech Community. As I travel really often to attend lots of conferences, I need a process to keep track of my tasks to organize traveling and preparing for my sessions.
As I am also a very proud learner and fan of Microsoft Flow, I wanted to figure out if there was a better way than manually creating tasks and folders and entries in SharePoint lists.
What I want:
Whenever I create a new event in my events-calendar, I want:
This event (like a SharePoint Saturday) in my SharePoint list,
A task to be created in a Planner bucket which is associated to the event
A new section in a OneNote Notebook
4 new pages in this new section (flights, hotel, session, general information)
A folder in my OneDrive for presentation, speaker info etc.
As I consider myself to be a very untechnical person, I needed to find a very simple solution. So, if you don’t think you are an IT-Pro or are not familiar with all this Office 365 stuff, I would love to encourage you to just follow my tutorial, it’s nearly tech-free :-) #JustGoWithTheFlow
Of course, I didn’t know everything and had to learn lots of new things, others felt already familiar to me. Special credits to Tomasz Poszytek and AlanO365
First, we need to do some stuff outside from Microsoft Flow.
PREPARATIONS
A) create a new calendar in Outlook. (Just right-click on your calendar, click NEW CALENDAR, type a name)
B) Create a new list in SharePoint: Go to a SharePoint Site where you have the rights to create a new list, click on the + icon, type in a name. We just need two additional columns to the title column: City and Date
C) Create a planner plan where you want to organize tasks related to events
D) Create a new OneNote notebook for your events
Now we just focus on the flow stuff — but no worries, I will make it as easy as it can be!
TRIGGER
Go to your browser and open Microsoft Flow flow.microsoft.com, log into your account and click on MY FLOWS → NEW → CREATE FROM BLANK → CREATE FROM BLANK
Click in the search bar of flow and type OUTLOOK, select OFFICE 365 OUTLOOK
- Select WHEN A NEW EVENT IS CREATED (V2) and now select your newly created calendar in the drop-down menu:

Congrats — you created your trigger! Now we need a few actions:
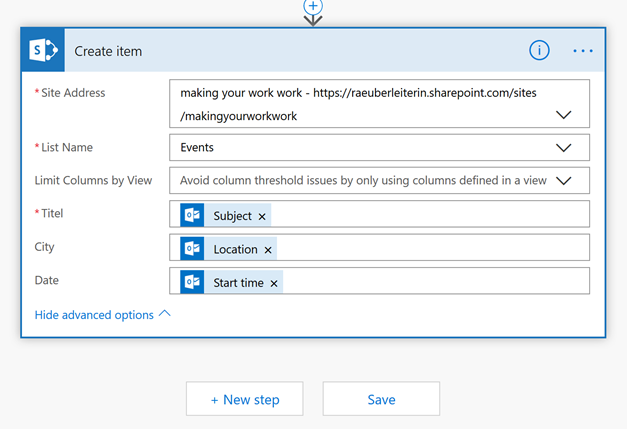
Click on New Step, type SHAREPOINT and then select CREATE ITEM, choose your site-address and the list you just created. Click on SHOW ADVANCED OPTIONS, now the columns of your SharePoint list appear as fields.
Click in the fields, click then on the DYNAMIC CONTENT and just click on the values you get from your Outlook event, so they get written in your SharePoint list.
PLANNER
- Now we need to Create a bucket in Planner to store our tasks in. Just click on NEW STEP and type PLANNER in the Flow search bar. Select PLANNER and then select CREATE A BUCKET

Again, just click on the DYNAMIC CONTENT and fill in the SharePoint list title as the name for the bucket and select the plan you want to create the new bucket in. My plan is just called TASKS.
- Now we need to create a new task in that bucket. Click on NEW STEP, type Planner in search bar and select CREATE A NEW TASK.
Select Plan ID and choose a meaningful title, what could be nicer than “organize travels to [ CITY]? So just type that in and select the CITY value from DYNAMIC CONTENT.

- Please don’t get scared when you see that expression in the due date field. It’s like an excel formula and really easy: What I want: I want to subtract 21 days from the start date of the event so that I book flight, hotels and so on 3 weeks before the event takes place.
Click on DYNAMIC CONTENT and then on EXPRESSION:

Now we need that formula, it’s called SubtractFromTime, so please type in SubtractFromTime() → We need those brackets like we need them in Excel! Please place your cursor between the brackets, this is important!
First argument of this formula is the time we want to subtract 21 days from. We already have that time as it is just the start date of our Outlook event. So please just select the select START TIME from the DYNAMIC CONTENT tab and TYPE a COMMA (very important!)
Please don’t worry that your formula now looks like this:

This is absolutely okay! We now need the number of days, in our case this is 21, but you can choose another value as well. So just type 21 and a COMMA (again, really important!)
After that, we need to specify which time unit this is: minutes or years or — in our case: days. We need to type: ‘day’
Please make sure that you don’t forget the ‘’ around day:
We already have our closing bracket, so we just click on OK:

Congrats — you dealt with an expression and dynamic content in it — — but to be honest: it’s just an excel formula (I won’t tell if you don’t :-) )
ONENOTE
Time for the next step:
- Click on NEW STEP, type ONENOTE, select CREATE NEW SECTION IN A NOTEBOOK

Select your Events Notebook and fill in the Subject of your OUTLOOK event from DYNAMIC CONTENT
- Click on NEW STEP and again, type ONENOTE, select CREATE PAGE IN A SECTION. Select your notebook and then choose the value PAGESURL from DYNAMIC CONTENT for the field NOTEBOOK SECTION
If you want to, we just use some very basic HTML for our page:
123456789
Short explanation:
What’s between
What’s between
andis what’s in your pageJust copy/past this code and only change what you want to be title and body of your page.
- Repeat step 10 two times and rename the steps by clicking on the three dots:

I want pages for Hotel, Flight, General information and my Session, but you can choose whatever you like. Just make sure to change the title in your html code as well.
- In the General page I want see all the information of the even as it is in the event body. As we already have this value, this is more than easy:
Just click between
andand choose the BODY value from DYNAMIC CONTENT — that’s it!ONEDRIVE
Now we do the scariest part of this flow. As we want to create a new folder for each event in my OneDrive, it would be easy if there was an action like “create a folder”. Unfortunately, there is no such action. :-(
But I found a way to do it anyway! Nearly everything in Office 365 can be created, listed, modified or deleted within Microsoft Graph.
We can call the Microsoft Graph in flow with an HTTP action. Problem: To get information from Microsoft Graph, we need a way to authenticate and the only way to do this is by registering an app in Azure AD.
Here we go:
AZURE AD
- Go to portal.azure.com an log in
Click on AZURE ACTIVE DIRECTORY in the left navigation:

Now click on APP REGISTRATIONS (PREVIEW) and now on NEW REGISTRATION


Type in a meaningful name and click OK.
- Click on your new app, give it a nice name and click REGISTER.
Save APPLICATION ID and DIRECTORY ID — we need that later!
- Click on CERTIFICATES & SECRETS and create a new secret by clicking on NEW CLIENT SECRET. Describe it with a name (MY PRECIOUS :-)) and click ADD.
**!! MOST IMPORTANT THING IN THE WORLD!!** > > **SAVE THAT KEY NOW** > >

We need that later, too!
- Now click on API PERMISSIONS to give the APP the right permissions:
Click MICROSOFT GRAPH, click DELEGATED PERMISSIONS. Permissions are grouped in alphabetical order, so just scroll down
We need DIRECTORY READ WRITE ALL and USER READ WRITE
- Now it’s getting a bit weird. Although we just dealt with permissions, we now need to grant them. This can be done by admin role, as I am my own admin, I just do it right here:

Congrats — we now have the app and the authentication for it!
MICROSOFT GRAPH
- Now we need some information from the Microsoft Graph itself. No worries, I’ll guide you through.
Go to graph.microsoft.com, Click on GRAPH EXPLORER and log in:

There is already a query in the bar:

- Just press RUN QUERY. (Just in case the field is empty or there is other stuff in it: https://graph.microsoft.com/v1.0/me )
Short explanation:
you asked the Graph to get you some information about your user (ME)
You get a response like this:

Copy that ID and save it for later!
Switch back to your Flow tab in your browser. Click NEXT STEP, type VARIABLE and select INITIALIZE VARIABLE.

Name should be Tenant ID; Type is STRING and the Value is the Directory ID you saved before.
As we need some variables, make sure you rename them by clicking on the three dots icon.
- Click NEXT STEP, type VARIABLE and select INITIALIZE VARIABLE.
Name should be APP ID; Type is STRING and the Value is the Application ID you saved before.
- Repeat 19 with the App Secret and with the Value ME. This now should look like this:

Perhaps you noticed that I did one just for the Graph URL — no need to do that.
- Now that we have that boring part of writing numbers into fields, we just click NEXT STEP and type HTTP in search bar and select HTTP ACTION
Choose Method POST and write: https://graph.microsoft.com/v1.0/users/ INSERT ME VARIABLE from DYNAMIC CONTENT drive/root/children
In Headers, we just need CONTENT-TYPE // APPLICATION/JSON
In Body, It’s a tiny piece of Json code:
{
“name”: “INSERT OUTLOOK SUBJECT”
“folder”: {}
}
Just copy/paste it.

Short explanation:
this is just a (phone) call to Graph: “Hey Dear Graph, please go to my OneDrive and create an empty folder with the same name my event has, thank you.”
(Graph is really a very nice tool and will do everything you ask for — if you do it correctly :-))
Now click on SHOW ADVANCED OPTIONS and fill the fields as shown in my screenshot. You get all the Variables from DYNAMIC CONTENT.
- That’s it. Give your Flow a nice name like “my Event Organization process” and just try it out.
Full Flow
Here is a screenshot of the full flow:

Feedback?!
Did you find value in this blogpost? Did you try to rebuild the flow? Please share your thoughts and make sure you clap for the post if you liked it, so I know what content you like the most.
If you need help, didn’t understand, found a mistake or want to provide other feedback: you can always find me on twitter @LuiseFreese or LinkedIn.

My name is
Luise Freese
You May Also Like

How to upload files to SharePoint for Dataverse integration in a Power Apps canvas appp
Use Case Recently, someone asked me if it was possible to utilize the …

How to build a deskbooking tool with Microsoft Planner and Power Automate
Use Case Recently, a customer asked if it was possible to low code …

How to organize your homeoffice with NFC tags and Apple
tl;dr With NFC tags and an iPhone you can quickly build a nice system …